Configure the Microsoft Azure cloud provider
This page details how to configure an Azure cloud provider for YugabyteDB clusters using the Yugabyte Platform console.
Prerequisites
You need to add the following cloud provider credentials in the Yugabyte Platform console:
- Subscription ID
- Tenant ID
- Application Client ID and Secret
- Resource Group
Yugabyte Platform uses the credentials to automatically provision and deprovision YugabyteDB instances.
You'll be able to see all the resources managed by Yugabyte Platform in your resource group, which will include Virtual Machines, Network Interface, Network Security Groups, Public IP addresses, and Disks.
Configure Azure
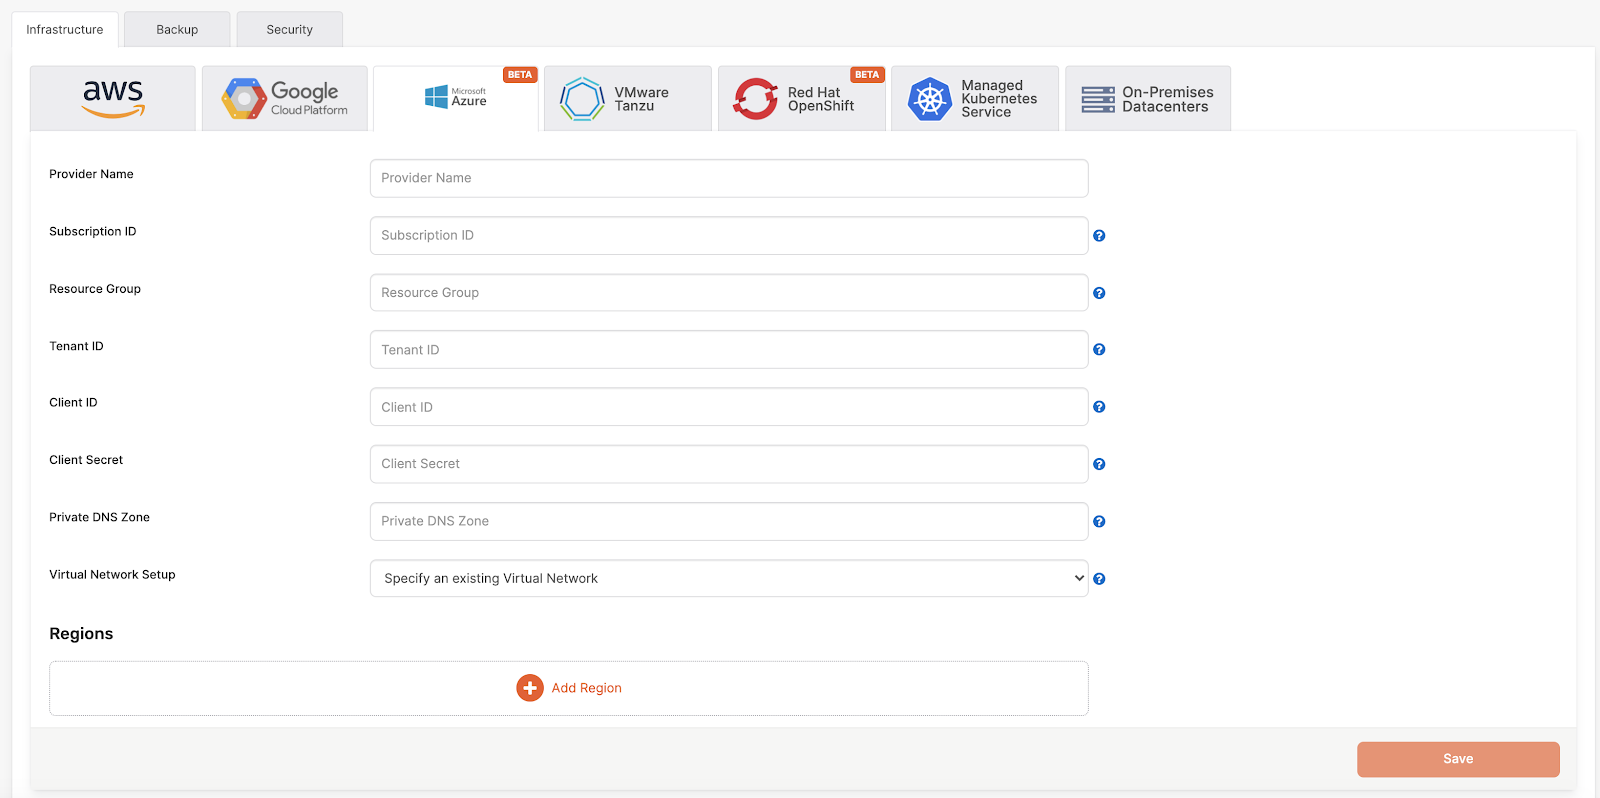
Provider name is an internal tag used for organizing your providers, so you know where you want to deploy your YugabyteDB universes.
Subscription ID is required for cost management. The virtual machine resources managed by the Platform will be tagged with this subscription.
Resource group is the group in which YugabyteDB nodes compute and network resources will be created. Your Azure Active Directory application (client ID and client secret) needs to have Network Contributor and Virtual Machine Contributor roles assigned for this resource group.
Tenant ID is the Azure Active Directory tenant ID which belongs to an active subscription. To find your tenant ID, follow the instructions on this Microsoft Azure page.
Client ID is the client ID of an application registered in your Azure Active Directory.
Client secret is the client secret of an application registered in your Azure Active Directory.
Private DNS zone lets you use a custom domain name for the nodes in your universe. Refer to Set a private DNS zone for instructions on how to set this up.
Virtual network setup. Using your custom Virtual Network is supported. This allows you the highest level of customization for your network setup.
Getting Azure resource IDs
To find an Azure resource's ID, navigate to the resource in question and click the JSON View link at the top right.

Azure resource IDs are of the following general format:
/subscriptions/<subscriptionID>/resourceGroups/<resourceGroup>/providers/Microsoft.<service>/path/to/resource
Set a private DNS zone (optional)
Setting a private DNS zone instructs Platform to register the universe name to all of the IP addresses in the universe within that DNS zone. Refer to this Microsoft document for more details on private DNS zones.
To set a private DNS zone, do the following:
-
On the Azure portal, create the Private DNS Zone:
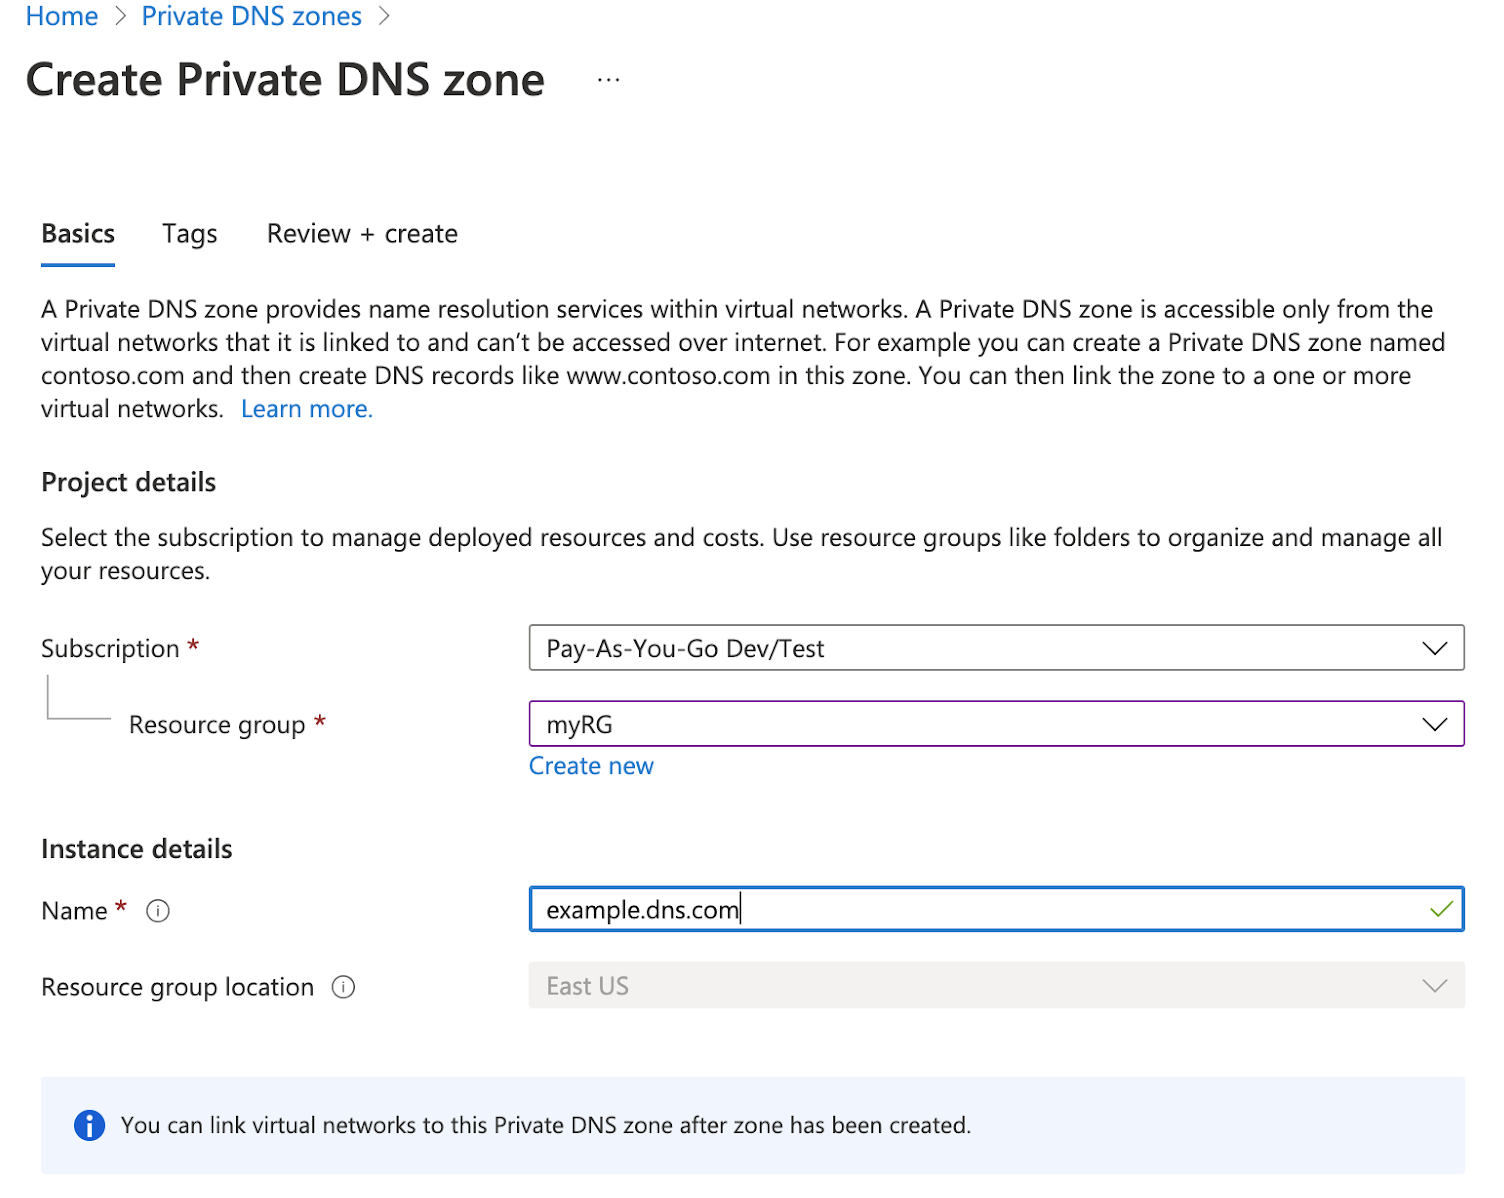
-
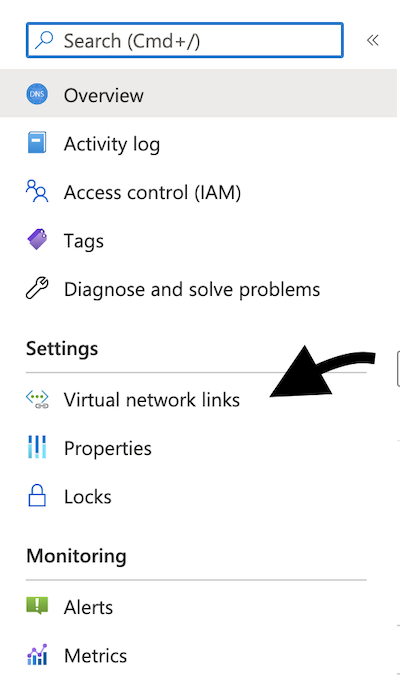
Navigate to the resource page and click “Virtual Network Links” on the left tab.
-
Add a link to the virtual network that you want it to be connected to. (For more details, refer to this Microsoft document.)
-
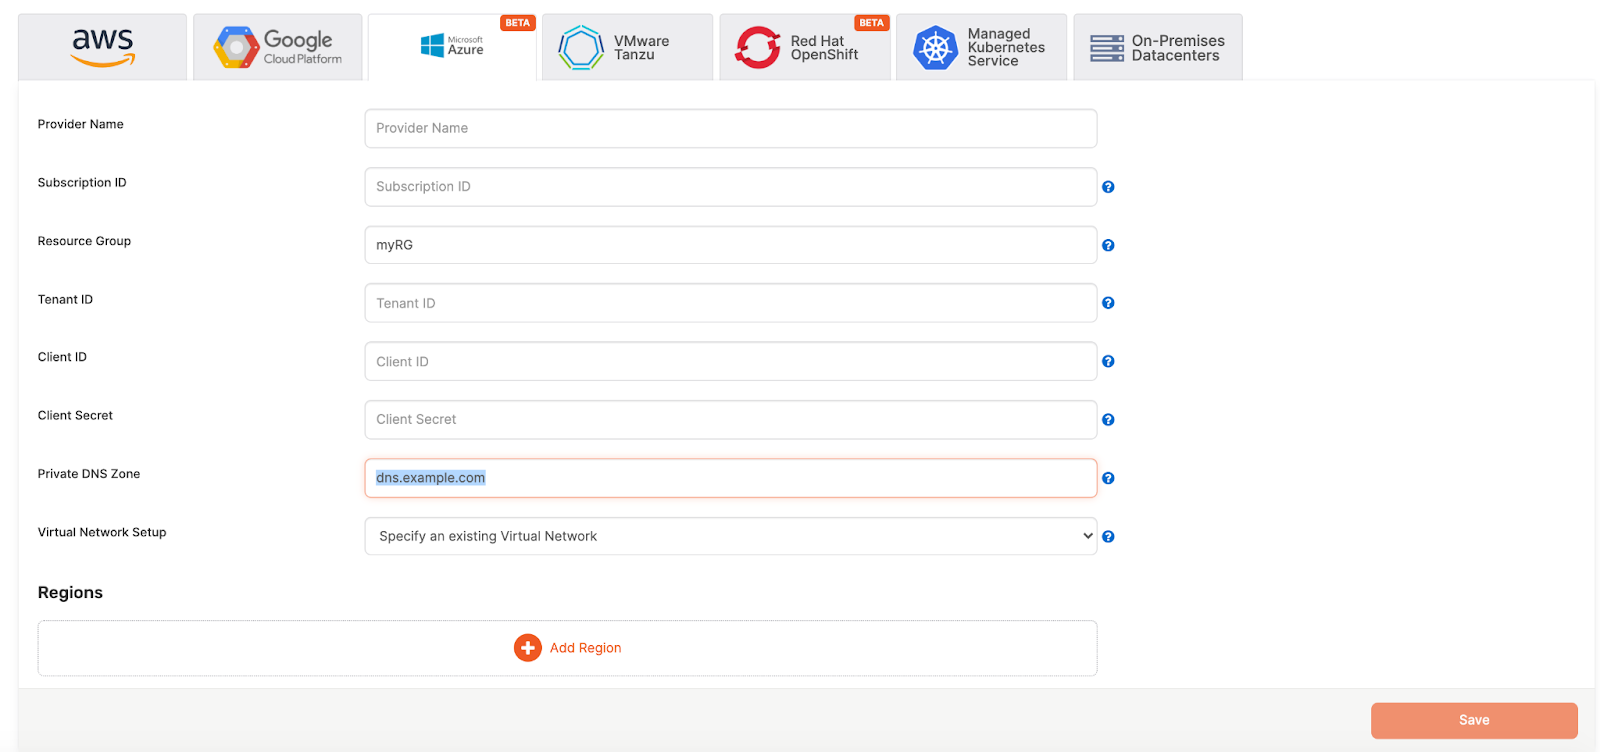
To use the Private DNS Zone in Platform, add either the Resource ID OR the name of the DNS zone to the “Private DNS Zone” field.
Note that if you enter the Resource ID, Platform infers the resource group from there. If you provide only the name, then Platform assumes that the resource group is the same as the group used in the provider.
Private DNS zone examples
In the following setup, we specify the private DNS zone as dns.example.com, and explicitly specify the resource group to be myRG:
In the following setup, we specify a complete resource ID for the private DNS zone. The resource ID is the following:
/subscriptions/SUBSCRIPTION_ID/resourceGroups/different-rg/providers/Microsoft.Network/privateDnsZones/dns.example.com
This specifies a resource group of different-rg and a DNS zone of dns.example.com. The different-rg resource group in the resource ID overrides the setting in the form's Resource Group field.

Specify Region Info
- Select a region and provide a virtual network name from your Azure portal.
- Security group is only needed if the database VM is in a different network than the platform.
- Provide the mapping of what Subnet IDs to use for each Availability Zone you wish to be able to deploy. This is required to ensure the Yugabyte Platform can deploy nodes in the correct network isolation that you desire in your environment.
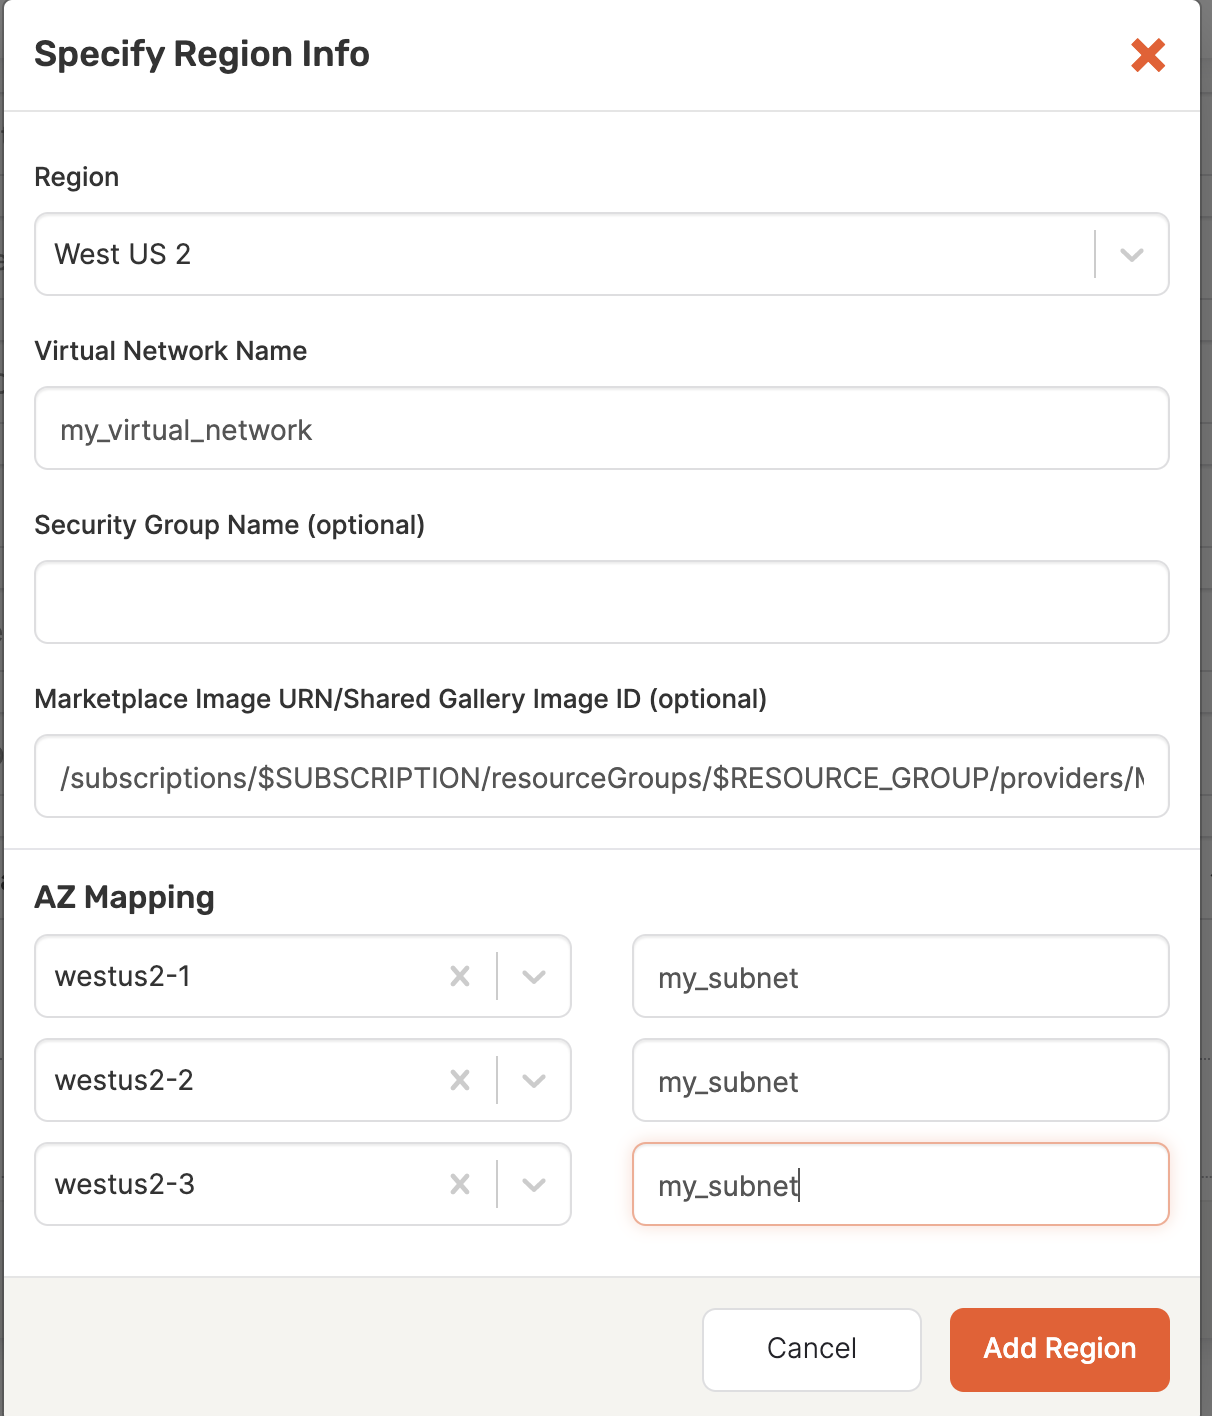
Click Save, and it will take a few minutes for the cloud provider to be configured. After that, you will be ready to create a YugabyteDB universe on Azure.
Shared image gallery
You can use shared image galleries as an alternative to using Marketplace Image URNs. Using a gallery, you can provide your own custom image that will be used when you create universe instances. For more information on shared image galleries, refer to Microsoft's documentation.
To set up a shared gallery image on Azure:
-
On the Azure portal, create a shared image gallery.
-
Create an image definition in that gallery.
-
Create a VM that you want to take a snapshot of.
-
Go to the VM and click “Capture” on the top menu bar. Fill in the information that’s asked for and choose the gallery and image definition you created in the previous steps.

-
Make sure that the images are replicated to each region in which you'll use them. The following would only work for US East for example. Or, refer to this Microsot document for another option.
-
To use the image in Platform, put the image version's resource ID into the Marketplace Image URN/Shared Gallery Image ID field of the Region Info popup.