Enable Encryption in Transit (TLS)
Yugabyte Platform allows you to protect data in transit by using the following:
- Server-to-server encryption for intra-node communication between YB-Master and YB-TServer nodes.
- Client-to-server encryption for communication between clients and nodes when using CLIs, tools, and APIs for YSQL and YCQL.
Note
Client-to-server TLS encryption is not supported for YEDIS. Before you can enable client-to-server encryption, you first must enable server-to-server encryption.Yugabyte Platform lets you create a new self-signed certificate, use an existing self-signed certificate, or upload a third-party certificate from external providers, such as Venafi or DigiCert (which is only available for an on-premise cloud provider).
In the current release, you can enable and disable TLS encryption during universe creation; you cannot change these settings after a universe has been created.
Self-Signed Certificates Generated by Yugabyte Platform
Yugabyte Platform can create self-signed certificates for each universe. These certificates may be shared between universes within a single instance of Yugabyte Platform. The certificate name has the following format:
yb-environment-universe_name, where environment is the environment type (either dev, stg, demo, or prod) that was used during the tenant registration (admin user creation), and universe-name is the provided universe name. The platform generates the root certificate, root private key, and node-level certificates, (assuming node-to-node encryption is enabled), and then provisions those artifacts to the database nodes any time nodes are created or added to the cluster. The following three files are copied to each node:
- The root certificate (
ca.cert). - The node certificate (
node.ip_address.crt). - The node private key (
node.ip_address.key).
The platform retains the root certificate and the root private key for all interactions with the cluster.
How to Use Platform-Generated Certificates to Enable TLS
You can enable TLS using certificates generated by Yugabyte Platform, as follows:
- Create a new universe via Universes > Create Universe and then configure it.
- Based on your requirements, select Enable Node-to-Node TLS and Enable Client-to-Node TLS.
- Choose an existing certificate from the Root Certificate list or create a new certificate by accepting the default option Create new certificate.
To view the certificate, navigate to Configs > Security > Encryption in Transit > Self Signed.
Self-Signed Self-Provided Certificates
Instead of using platform-provided certificates, you can also use your own self-signed certificates that you upload to the platform by following the procedure described in How to Use Self-Signed Self-Provided Certificates to Enable TLS.
The certificates must meet the following criteria:
- Be in the
.crtformat and the private key must be in the.pemformat, with both of these artifacts available for upload. - Contain IP addresses of the target database nodes or DNS names as the Subject Alternative Names (wildcards are acceptable).
The platform produces the node (leaf) certificates from the uploaded certificates and copies the certificate chain, leaf certificate, and private key to the nodes in the cluster.
How to Use Self-Signed Self-Provided Certificates to Enable TLS
You can enable TLS using your own certificates, as follows:
- Navigate to Configs > Security > Encryption in Transit.
- Click Add Certificate to open the Add Certificate dialog.
- On the Add Certificate dialog, select the Self Signed tab.
- Click Upload Certificate File, then browse to the root certificate file (
<file-name>.crt) and upload it. - Click Upload Key File, then browse to the root certificate file (
<file-name>.key) and upload it. - In the Certificate Name field, enter a meaningful name for your certificate.
- In the Root Certificate Expiration Date field, specify the expiration date of the certificate. To find this information, execute the
openssl x509 -in <root crt file path> -text -nooutcommand and note the Validity Not After date. - Click Add to make the certificate available.
- Go to Universes > Create Universe to open the Create Universe dialog.
- Configure the universe.
- Based on your requirements, select Enable Node-to-Node TLS and Enable Client-to-Node TLS.
- Select an existing certificate from the Root Certificate list and then select the certificate that you have uploaded.
- Create the universe.
Custom CA-Signed Self-Provided Certificates
For universes created with an on-premise cloud provider, instead of using self-signed certificates, you can use third-party certificates from external CAs. The third-party CA root certificate must be configured in the platform and the node keys. You have to copy the certificates to the appropriate database nodes using the procedure described in How to Use Custom CA-Signed Certificates to Enable TLS.
The certificates must meet the following criteria:
- Be in the
.crtformat and the private key must be in the.pemformat. - Contain IP addresses of the database nodes or DNS names as the Subject Alternative Names (wildcards are acceptable).
How to Use Custom CA-Signed Certificates to Enable TLS
The following procedure describes how to install certificates on the database nodes. You have to repeat these steps for every database node that is to be used in the creation of a universe.
Step 1: Obtain the keys and the custom CA-signed certificates for each of the on-premise nodes for which you are configuring node-to-node TLS. In addition, obtain the keys and the custom signed certificates for client access for configuring client-to-node TLS.
Step 2: Copy the custom CA root certificate, node certificate, and node key to the respective on-premise nodes file system.
If you are enabling client-to-node TLS, make sure to copy the client certificate and client key to each of the nodes.
In addition, ensure the following:
- That the file names and file paths of different certificates and keys are identical across all the database nodes. For example, if you name your CA root certificate as
ca.crton one node, then name itca.crton all the nodes. Similarly, if you copyca.crtto/opt/yugabyte/keyson one node, then copyca.crtto the same path on other nodes. - That the yugabyte system user has read permissions to all the certificates and keys.
Step 3: Create a CA-signed certificate in Yugabyte Platform, as follows:
-
Navigate to Configs, select the Security tab, and then select the Encryption in Transit tab.
-
Select the CA Signed tab shown in the following illustration.
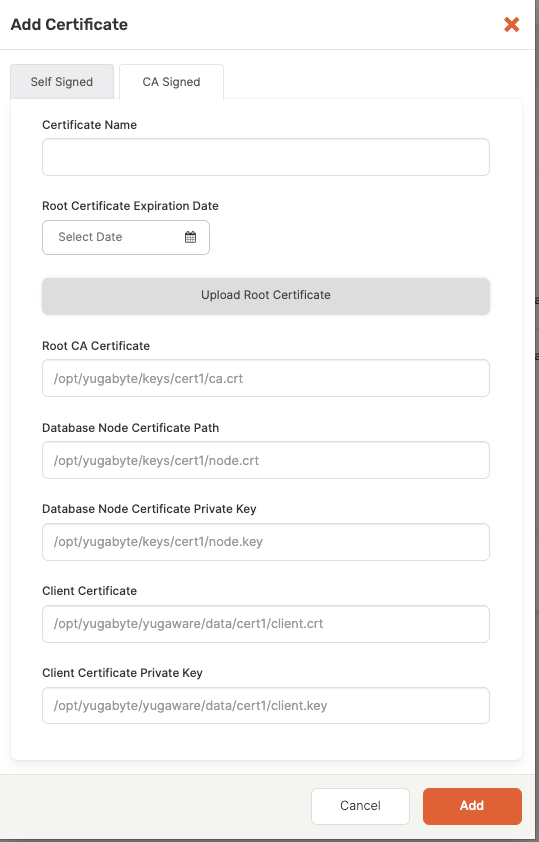
- Upload the custom CA root certificate as the root certificate. If you do not have the root certificate, contact your CA.
- Enter the file paths for each of the certificates on the nodes. These are the paths from the previous step.
- In the Certificate Name field, enter a meaningful name for your certificate.
- Use the Root Certificate Expiration Date field to specify the expiration date of the certificate. To find this information, execute the
openssl x509 -in <root crt file path> -text -nooutcommand and note the Validity Not After date. - Click Add to make the certificate available.
- Go to Universes > Create Universe to open the Create Universe dialog.
- Configure the universe.
- Based on your requirements, select Enable Node-to-Node TLS and Enable Client-to-Node TLS.
- Select an existing certificate from the Root Certificate list and then select the certificate that you have uploaded.
- Create the universe.
How to Rotate Custom CA-Signed Certificates
You can rotate custom CA-signed certificates for universes configured with these type of certificates.
The following procedure describes how to rotate the existing custom certificates and replace them with new database node certificates issued by the same custom CA that issued the original certificates. Note that in the current release, Yugabyte Platform does not support changing the root CA certificate.
Step 1: Follow Step 1 of How to Use Custom CA-Signed Certificates to Enable TLS to obtain a new set of certificates for each of the nodes.
Step 2: Follow Step 2 of How to Use Custom CA-Signed Certificates to Enable TLS to copy the certificates to the respective nodes.
Step 3: Follow Step 3 of How to Use Custom CA-Signed Certificates to Enable TLS to create a new CA-signed certificate in Yugabyte Platform.
Step 4: Edit the universe to use the new certificates, as follows:
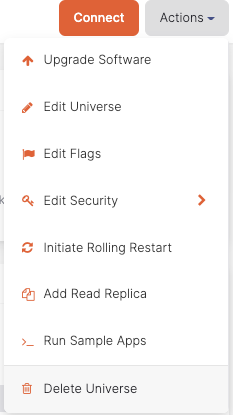
- Navigate to the universe for which you are rotating the keys.
- Select Actions > Edit Security, as shown in the following illustration.
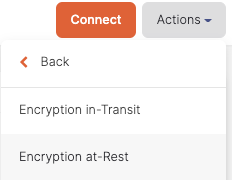
- Select Encryption in-Transit, as shown in the following illustration.
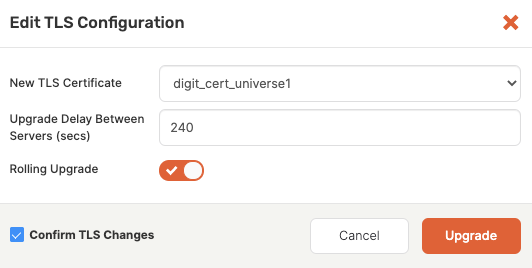
- Complete the Edit TLS Configuration dialog shown in the following illustration:
- Select the new certificate which you created in Step 3.
- Modifying the certificates requires restarting Master and T-Server processes. To avoid downtime, select Rolling Upgrade and specify the delay between node upgrades.
- Click Upgrade. Typically, this process takes time as it needs to wait for the specified delay interval after each node is upgraded.
How to Expand the Universe
You can expand universes configured with custom CA-signed certificates.
Before adding new nodes to expand an existing universe, you need to prepare those nodes by repeating Step 2 of How to Use Custom CA-Signed Certificates to Enable TLS for each of the new nodes you plan to add to the universe. You need to ensure that the certificates are signed by the same external CA and have the same root certificate. In addition, ensure that you copy the certificates to the same locations that you originally used when creating the universe.
When the universe is ready for expansion, complete the Edit Universe dialog to add new nodes.
Connecting to Clusters
Using TLS, you can conntect to the YSQL and YCQL endpoints.
How to Connect to a YSQL Endpoint with TLS
If you created your universe with the Client-to-Node TLS option enabled, then you must download client certificates to your client computer to establish connection to your database, as follows:
-
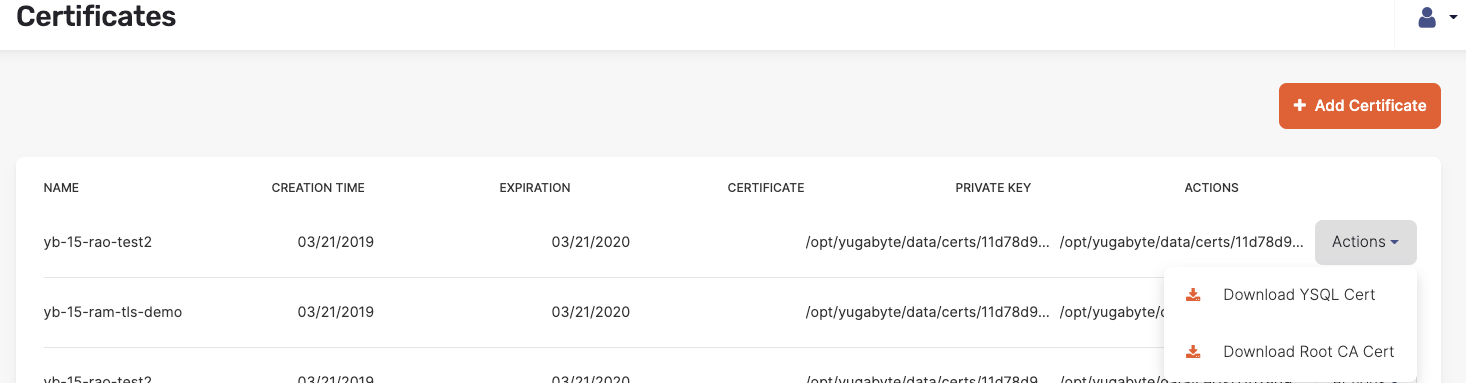
Navigate to the Certificates page and then to your universe’s certificate.
-
Click Actions and select Download YSQL Cert, as shown in the following illustration. This triggers the download of the
yugabytedb.crtandyugabytedb.keyfiles.

-
Optionally, when connecting to universes that are configured with custom CA-signed certificates, obtain the root CA and client YSQL certificate from your administrator. These certificates are not available on Yugabyte Platform for downloading.
-
For testing with a
ysqlshclient, paste theyugabytedb.crtandyugabytedb.keyfiles into the<home-dir>/.yugabytedbdirectory and change the permissions to0600, as follows:
$ mkdir ~/.yugabytedb; cd ~/.yugabytedb
$ cp <DownloadDir>/yugabytedb.crt .
$ cp <DownloadDir>/yugabytedb.key .
$ chmod 600 yugabytedb.*
- Run
ysqlshusing thesslmode=requireoption, as follows:
$ cd <yugabyte software install directory>
$ bin/ysqlsh -h 172.152.43.78 -p 5433 sslmode=require
ysqlsh (11.2-YB-2.3.3.0-b0)
SSL connection (protocol: TLSv1.2, cipher: ECDHE-RSA-AES256-GCM-SHA384, bits: 256, compression: off)
Type "help" for help.

yugabyte=#
To use TLS from a different client, consult the client-specific documentation. For example, if you are using a Postgres JDBC driver to connect to YugabyteDB, see Configuring the Client for more details.
How to Connect to a YCQL Endpoint with TLS
If you created your universe with the Client-to-Node TLS option enabled, then you must download client certificates to your client computer to establish connection to your database, as follows:
-
Navigate to the Certificates page and then to your universe’s certificate.
-
Click Actions and select Download Root Cert, as shown in the following illustration. This triggers the download of the
root.crtfile.
-
Optionally, when connecting to universes that are configured with custom CA-signed certificates, obtain the root CA and client YSQL certificate from your administrator. These certificates are not available on Yugabyte Platform for downloading.
-
Set
SSL_CERTFILEenvironment variable to point to the locatioin of the downloaded root certificate. -
Run
ycqlshusing the-ssloption, as follows:
$ cp <DownloadDir>/root.crt ~/.yugabytedb/root.crt
$ export SSL_CERTFILE=~/.yugabytedb/root.crt
$ bin/ycqlsh 172.152.43.78 --ssl
Connected to local cluster at 172.152.43.78:9042.
[ycqlsh 5.0.1 | Cassandra 3.9-SNAPSHOT | CQL spec 3.4.2 | Native protocol v4]
Use HELP for help.
ycqlsh>
To use TLS from a different client, consult the client-specific documentation. For example, if you are using a Cassandra driver to connect to YugabyteDB, see SSL .
Validating Certificates
When configuring and using certificates, SSL issues may occasionally arise. You can validate your certificates and keys as follows:
- Verify that the CA CRT and CA private key match by executing the following commands:
openssl rsa -noout -modulus -in ca.key | openssl md5
openssl x509 -noout -modulus -in ca.crt | openssl md5

\# outputs should match
- Verify that the CA CRT is actually a certificate authority by executing the following command:
openssl x509 -text -noout -in ca.crt

\# Look for fields

X509v3 Basic Constraints:

  CA:TRUE
-
Verify that certificates and keys are in PEM format (as opposed to the DER or other format). If these artifacts are not in the PEM format and you require assistance with converting them or identifying the format, consult Converting Certificates.
-
Ensure that the private key does not have a passphrase associated with it. For information on how to identify this condition, see How to Decrypt an Enrypted SSL RSA Private Key.
Enforcing TLS Versions
As TLS 1.0 and 1.1 are no longer accepted by PCI compliance, and considering significant vulnerabilities around these versions of the protocol, it is recommended that you migrate to TLS 1.2 (default).
You can set the TLS version for node-to-node and client-node communication. To enforce the minimum TLS version of 1.2, add the following flag for T-Server:
ssl_protocols = tls12