Sharding Data Across Nodes
YugabyteDB automatically splits user tables into multiple shards, called tablets, using either a hash- or range- based strategy.
The primary key for each row in the table uniquely determines the tablet the row lives in. This is shown in the following figure.
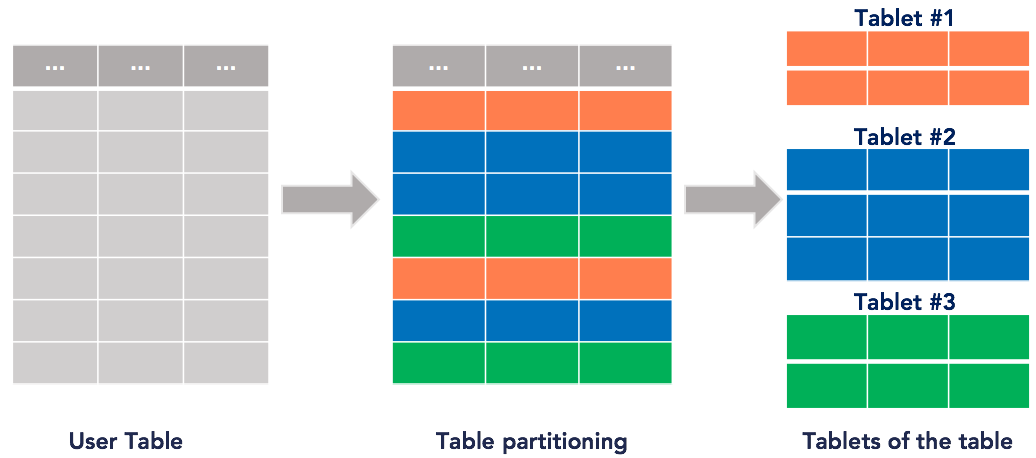
By default, YugabyteDB creates eight tablets per node in the cluster for each table and automatically distributes the data across the various tablets, which in turn are distributed evenly across the nodes. In the Try it out section, you'll explore how automatic sharding is done internally for tables. The system Redis table works in exactly the same way.
Sharding strategies
Sharding is the process of breaking up large tables into smaller chunks called shards that are spread across multiple servers. Essentially, a shard is a horizontal data partition that contains a subset of the total data set, and hence is responsible for serving a portion of the overall workload. The idea is to distribute data that can’t fit on a single node onto a cluster of database nodes.
Sharding is also referred to as horizontal partitioning. The distinction between horizontal and vertical comes from the traditional tabular view of a database. A database can be split vertically—storing different table columns in a separate database, or horizontally—storing rows of the same table in multiple database nodes.
YugabyteDB currently supports two ways of sharding data: hash (also known as consistent hash) sharding, and range sharding.
Hash sharding
With (consistent) hash sharding, a partitioning algorithm distributes data evenly and randomly across shards. The algorithm places each row of the table into a shard determined by computing a consistent hash on the partition column values of that row.
The hash space for hash-sharded YugabyteDB tables is the 2-byte range from 0x0000 to 0xFFFF. A table may therefore have at most 65,536 tablets. We expect this to be sufficient in practice even for very large data sets or cluster sizes.
For example, for a table with 16 tablets the overall hash space of 0x0000 to 0xFFFF is divided into 16 sub-ranges, one for each tablet: 0x0000 to 0x1000, 0x1000 to 0x2000, and so on up to 0xF000 to 0xFFFF. Read and write operations are processed by converting the primary key into an internal key and its hash value, and determining the tablet to which the operation should be routed.
Hash sharding is ideal for massively scalable workloads, as it distributes data evenly across all the nodes in the cluster, while retaining ease of adding nodes into the cluster.
With consistent hash sharding, there are many more shards than the number of nodes and there is an explicit mapping table maintained tracking the assignment of shards to nodes. When adding new nodes, a subset of shards from existing nodes can be efficiently moved into the new nodes without requiring a massive data reassignment.
A potential downside of hash sharding is that performing range queries could be inefficient. Examples of range queries are finding rows greater than a lower bound or less than an upper bound (as opposed to point lookups).
Hash sharding example
In YSQL, create a table with hash sharding:
CREATE TABLE customers (
    customer_id bpchar NOT NULL,
    company_name character varying(40) NOT NULL,
    contact_name character varying(30),
    contact_title character varying(30),
    address character varying(60),
    city character varying(15),
    region character varying(15),
    postal_code character varying(10),
    country character varying(15),
    phone character varying(24),
    fax character varying(24),
    PRIMARY KEY (customer_id HASH)
);
In YCQL, you can only create tables with hash sharding, so an explict syntax for setting hash sharding is not necessary.
CREATE TABLE items (
    supplier_id INT,
    item_id INT,
    supplier_name TEXT STATIC,
    item_name TEXT,
    PRIMARY KEY((supplier_id), item_id)
);
Range sharding
Range sharding involves splitting the rows of a table into contiguous ranges, based on the primary key column values. Range-sharded tables usually start out with a single shard. As data is inserted into the table, it is dynamically split into multiple shards because it is not always possible to know the distribution of keys in the table ahead of time.
This type of sharding allows efficiently querying a range of rows by the primary key values. Examples of such a query is to look up all keys that lie between a lower bound and an upper bound.
Range sharding has a few issues at scale, including:
-
Starting out with a single shard means that a single node is handling all user queries.
This often results in a database “warming” problem, where all queries are handled by a single node even if there are multiple nodes in the cluster. The user would have to wait for enough splits to happen and these shards to get redistributed before all nodes in the cluster are being utilized. This can be a big issue in production workloads. This can be mitigated in some cases where the distribution is keys is known ahead of time by presplitting the table into multiple shards, however this is hard in practice. -
Globally ordering keys across all the shards often generates hot spots, in which some shards get much more activity than others.
Nodes hosting hot spots are overloaded relative to others. You can mitigate this to some extent with active load balancing, but this does not always work well in practice: by the time hot shards are redistributed across nodes, the workload may have changed and introduced new hot spots.
Range sharding example
In YSQL, create a table with range sharding:
CREATE TABLE order_details (
    order_id smallint NOT NULL,
    product_id smallint NOT NULL,
    unit_price real NOT NULL,
    quantity smallint NOT NULL,
    discount real NOT NULL,
    PRIMARY KEY (order_id ASC, product_id),
    FOREIGN KEY (product_id) REFERENCES products,
    FOREIGN KEY (order_id) REFERENCES orders
);
In YCQL, you can't create tables with range sharding. YCQL tables are always hash sharded.
Try it out
In this tutorial, you'll explore automatic sharding inside YugabyteDB. First, you'll create some tables with a replication factor (RF) of 1. This makes it easier to understand how automatic sharding works independent of data replication. Then, you'll insert entries one by one, and examine which how the data gets distributed across the various nodes.
This tutorial uses the yb-ctl local cluster management utility.
Create a universe
To create a universe, do the following:
-
If you have a currently running local universe, destroy it using the following.
$ ./bin/yb-ctl destroy -
Start a new local universe with a replication factor of 1 (RF=1). We are passing the following flags:
--rfcreates a universe with a replication factor of 1.--num_shards_per_tservercontrols the total number of tablets (or partitions) when creating a new table. By setting the value to4, 12 tablets will be created on a 3-node cluster.--tserver_flags "memstore_size_mb=1"sets the total size of memstores on the tablet-servers to1MB. This will force a flush of the data to disk when a value greater than 1MB is added, so that you can observe which tablets the data is written to.
Warning
Settingmemstore_sizeto such a low value is not recommended in production, and is only being used here to illustrate the point by forcing flushes to happen more quickly.$ ./bin/yb-ctl --rf 1 --num_shards_per_tserver 4 create \ --tserver_flags "memstore_size_mb=1" -
Add two more nodes to make this a 3-node, rf=1 universe. We need to pass the memstore_size flag to each of the added YB-TServer servers.
$ ./bin/yb-ctl add_node --tserver_flags "memstore_size_mb=1"$ ./bin/yb-ctl add_node --tserver_flags "memstore_size_mb=1" -
Check the status of the cluster to confirm that you have three YB-TServer servers.
$ ./bin/yb-ctl status---------------------------------------------------------------------------------------------------- | Node Count: 3 | Replication Factor: 1 | ---------------------------------------------------------------------------------------------------- | JDBC : jdbc:postgresql://127.0.0.1:5433/yugabyte | | YSQL : ./bin/ysqlsh | | YCQL : ./bin/ycqlsh 127.0.0.1 9042 | | YEDIS : ./bin/redis-cli -h 127.0.0.1 -p 6379 | | Web UI : http://127.0.0.1:7000/ | | Cluster Data : /Users/schoudhury/yugabyte-data | ---------------------------------------------------------------------------------------------------- ---------------------------------------------------------------------------------------------------- | Node 1: yb-tserver (pid 72053), yb-master (pid 72050) | ---------------------------------------------------------------------------------------------------- | JDBC : jdbc:postgresql://127.0.0.1:5433/postgres | | YSQL : ./bin/ysqlsh | | YCQL : ./bin/ycqlsh 127.0.0.1 9042 | | YEDIS : ./bin/redis-cli -h 127.0.0.1 -p 6379 | | data-dir[0] : /Users/schoudhury/yugabyte-data/node-1/disk-1/yb-data | | TServer Logs : /Users/schoudhury/yugabyte-data/node-1/disk-1/yb-data/tserver/logs | | Master Logs : /Users/schoudhury/yugabyte-data/node-1/disk-1/yb-data/master/logs | ---------------------------------------------------------------------------------------------------- ---------------------------------------------------------------------------------------------------- | Node 2: yb-tserver (pid 72128) | ---------------------------------------------------------------------------------------------------- | JDBC : jdbc:postgresql://127.0.0.1:5433/postgres | | YSQL : ./bin/ysqlsh | | YCQL : ./bin/ycqlsh 127.0.0.2 9042 | | YEDIS : ./bin/redis-cli -h 127.0.0.2 -p 6379 | | data-dir[0] : /Users/schoudhury/yugabyte-data/node-2/disk-1/yb-data | | TServer Logs : /Users/schoudhury/yugabyte-data/node-2/disk-1/yb-data/tserver/logs | ---------------------------------------------------------------------------------------------------- ---------------------------------------------------------------------------------------------------- | Node 3: yb-tserver (pid 72166) | ---------------------------------------------------------------------------------------------------- | JDBC : jdbc:postgresql://127.0.0.1:5433/postgres | | YSQL : ./bin/ysqlsh -U postgres -h 127.0.0.3 -p 5433 | | YCQL : ./bin/ycqlsh 127.0.0.3 9042 | | YEDIS : ./bin/redis-cli -h 127.0.0.3 -p 6379 | | data-dir[0] : /Users/schoudhury/yugabyte-data/node-3/disk-1/yb-data | | TServer Logs : /Users/schoudhury/yugabyte-data/node-3/disk-1/yb-data/tserver/logs | ----------------------------------------------------------------------------------------------------
Create a table
Once you've got your nodes set up, you can create a YCQL table. Since you'll be using a workload application in the YugabyteDB workload generator to write data into this table, create the keyspace and table name below exactly as shown.
$ ./bin/ycqlsh
ycqlsh> CREATE KEYSPACE ybdemo_keyspace;
ycqlsh> CREATE TABLE ybdemo_keyspace.cassandrakeyvalue (k text PRIMARY KEY, v blob);
For each table, YugabyteDB creates four shards for each YB-TServer in this universe. Because you have three nodes, this should create 12 tablets for the ybdemo_keyspace.cassandrakeyvalue table.
Explore tablets
The tablets are evenly balanced across the various nodes. You can see the number of tablets per node in the Tablet Servers page of the master Admin UI, by going to the table details page. The page should look something like the image below.
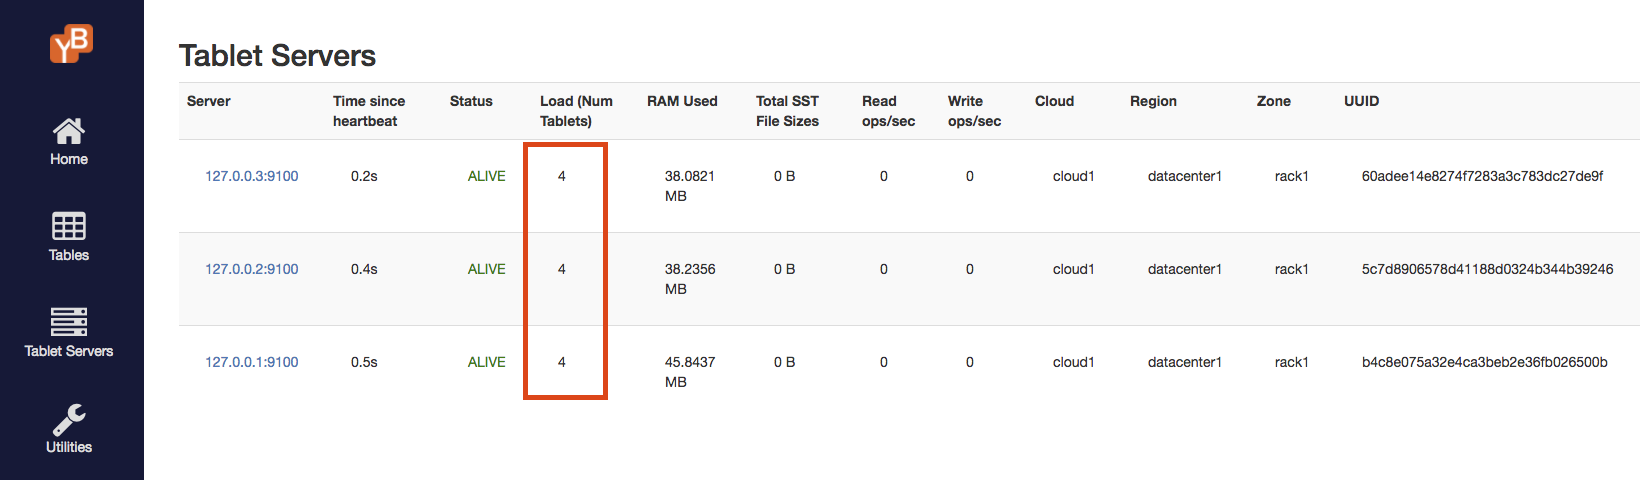
Notice that each node has 4 tablets, and the total number of tablets is 12 as expected.
The table has 12 tablets, each owning a range of the keyspace. Navigate to the table details page to examine the various tablets. This page should look as follows.
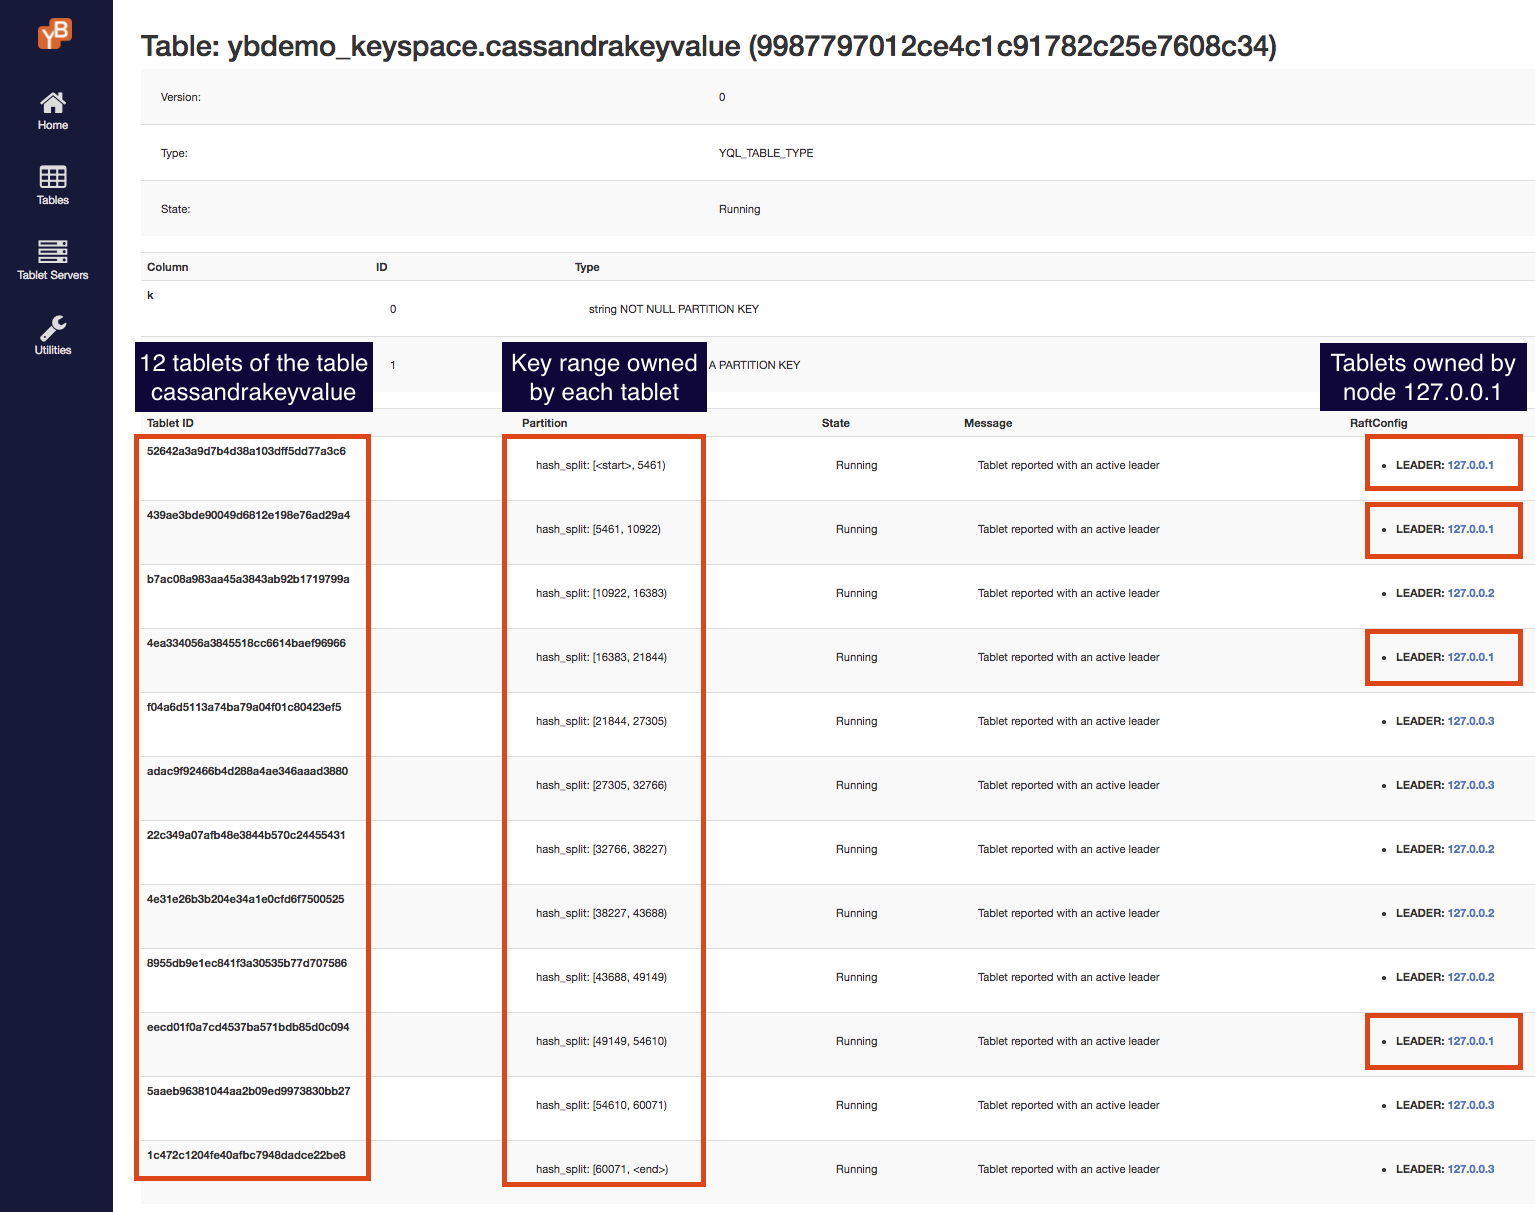
There are 12 tablets as expected, and the key ranges owned by each tablet are shown. This page also shows which node is currently hosting (and is the leader for) each tablet. Note here that tablet balancing across nodes happens on a per-table basis, with each table scaled out to an appropriate number of nodes.
Each tablet has a separate directory dedicated to it for data. List out all the tablet directories and check their sizes, as follows:
$ du -hs /yugabyte-data/node*/disk*/yb-data/tserver/data/rocksdb/table*/* | grep -v '0B'
 20K    /yugabyte-data/node-1/disk-1/yb-data/tserver/data/rocksdb/table-9987797012ce4c1c91782c25e7608c34/tablet-439ae3bde90049d6812e198e76ad29a4
 20K    /yugabyte-data/node-1/disk-1/yb-data/tserver/data/rocksdb/table-9987797012ce4c1c91782c25e7608c34/tablet-eecd01f0a7cd4537ba571bdb85d0c094
 20K    /yugabyte-data/node-1/disk-2/yb-data/tserver/data/rocksdb/table-9987797012ce4c1c91782c25e7608c34/tablet-4ea334056a3845518cc6614baef96966
 20K    /yugabyte-data/node-1/disk-2/yb-data/tserver/data/rocksdb/table-9987797012ce4c1c91782c25e7608c34/tablet-52642a3a9d7b4d38a103dff5dd77a3c6
 20K    /yugabyte-data/node-2/disk-1/yb-data/tserver/data/rocksdb/table-9987797012ce4c1c91782c25e7608c34/tablet-4e31e26b3b204e34a1e0cfd6f7500525
 20K    /yugabyte-data/node-2/disk-1/yb-data/tserver/data/rocksdb/table-9987797012ce4c1c91782c25e7608c34/tablet-b7ac08a983aa45a3843ab92b1719799a
 20K    /yugabyte-data/node-2/disk-2/yb-data/tserver/data/rocksdb/table-9987797012ce4c1c91782c25e7608c34/tablet-22c349a07afb48e3844b570c24455431
 20K    /yugabyte-data/node-2/disk-2/yb-data/tserver/data/rocksdb/table-9987797012ce4c1c91782c25e7608c34/tablet-8955db9e1ec841f3a30535b77d707586
 20K    /yugabyte-data/node-3/disk-1/yb-data/tserver/data/rocksdb/table-9987797012ce4c1c91782c25e7608c34/tablet-adac9f92466b4d288a4ae346aaad3880
 20K    /yugabyte-data/node-3/disk-1/yb-data/tserver/data/rocksdb/table-9987797012ce4c1c91782c25e7608c34/tablet-f04a6d5113a74ba79a04f01c80423ef5
 20K    /yugabyte-data/node-3/disk-2/yb-data/tserver/data/rocksdb/table-9987797012ce4c1c91782c25e7608c34/tablet-1c472c1204fe40afbc7948dadce22be8
 20K    /yugabyte-data/node-3/disk-2/yb-data/tserver/data/rocksdb/table-9987797012ce4c1c91782c25e7608c34/tablet-5aaeb96381044aa2b09ed9973830bb27
Insert and query a table
In this section, you'll use a sample app to insert a key-value entry with the value size around 2MB. Since the memstores are configured to be 1MB, this causes the data to flush to disk immediately.
The key flags you pass to the sample app are:
--num_unique_keys 1to write exactly one key. Keys are numbers converted to text, and typically start from 0.--num_threads_read 0to not perform any reads (hence 0 read threads).--num_threads_write 1creates one writer thread. Since you're not writing a lot of data, a single writer thread is sufficient.--value_size 10000000to generate the value being written as a random byte string of around 10MB size.--nouuidto not prefix a UUID to the key. A UUID allows multiple instances of the load tester to run without interfering with each other.
Let's get started:
-
Download the YugabyteDB workload generator JAR file (
yb-sample-apps.jar):$ wget https://github.com/yugabyte/yb-sample-apps/releases/download/1.3.6/yb-sample-apps.jar -
Run the
CassandraKeyValueworkload application.$ java -jar ./yb-sample-apps.jar --workload CassandraKeyValue \ --nodes 127.0.0.1:9042 \ --nouuid \ --num_unique_keys 1 \ --num_writes 2 \ --num_threads_read 0 \ --num_threads_write 1 \ --value_size 100000002018-02-05 07:33:33,525 [INFO|...] Num unique keys to insert: 1 ... 2018-02-05 07:33:36,899 [INFO|...] The sample app has finished -
Check what you've inserted using
ycqlsh.$ ./bin/ycqlshycqlsh> SELECT k FROM ybdemo_keyspace.cassandrakeyvalue;k ------- key:0 (1 rows) -
Next, check the sizes of the various tablets:
$ du -hs /yugabyte-data/node*/disk*/yb-data/tserver/data/rocksdb/table*/* | grep -v '0B'20K .../rocksdb/table-9987797012ce4c1c91782c25e7608c34/tablet-439ae3bde90049d6812e198e76ad29a4 9.6M .../rocksdb/table-9987797012ce4c1c91782c25e7608c34/tablet-eecd01f0a7cd4537ba571bdb85d0c094 20K .../rocksdb/table-9987797012ce4c1c91782c25e7608c34/tablet-4ea334056a3845518cc6614baef96966 ... -
Here, the key has been written to one of the tablets. In this example, the tablet's UUID is
eecd01f0a7cd4537ba571bdb85d0c094. Check the table details page to determine which node this tablet belongs to, and in this case it'snode-1.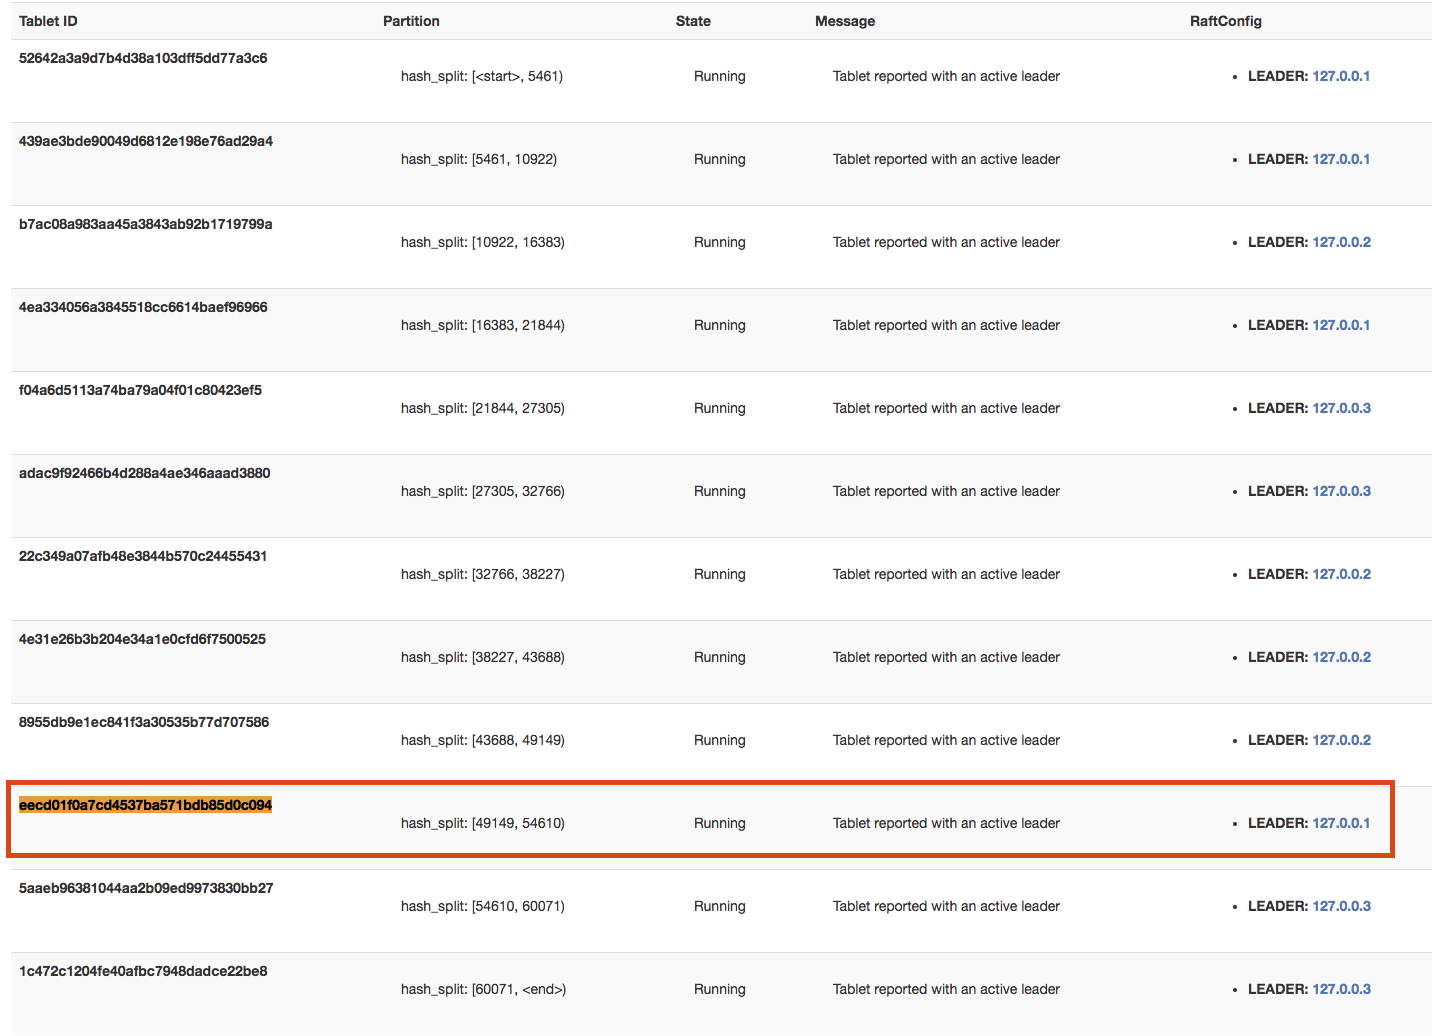
-
You can also easily confirm that
node-1does have about 10MB of storage being used.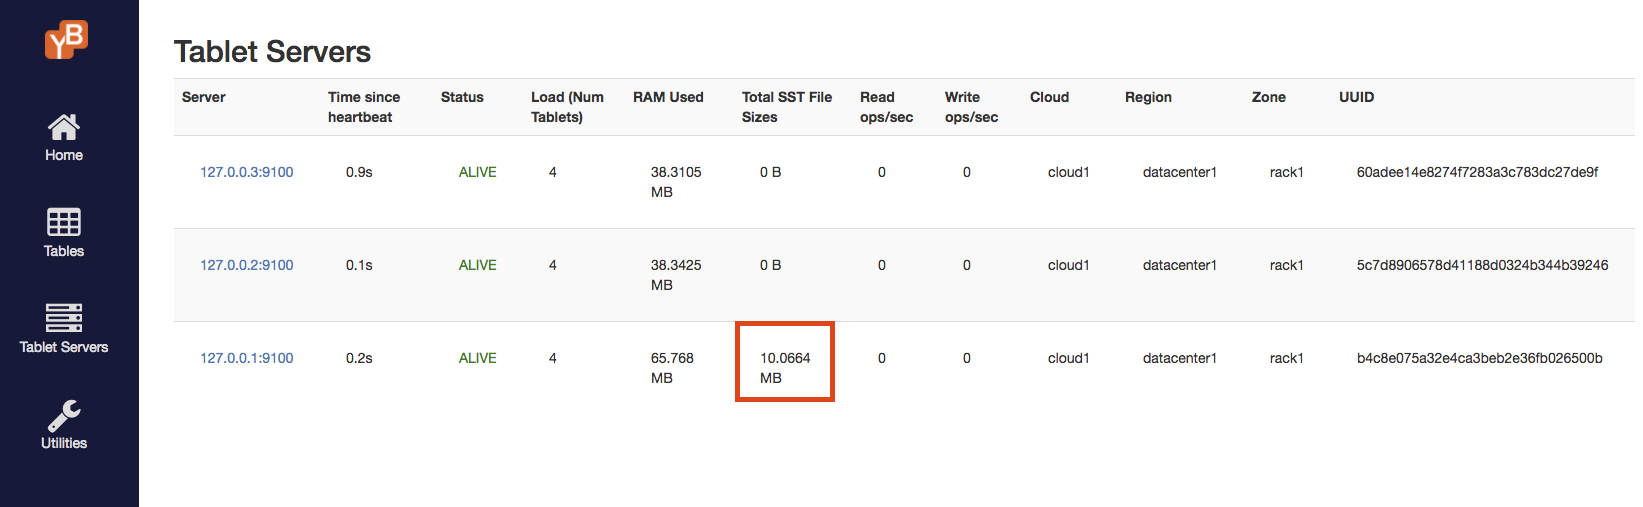
Automatic sharding when adding nodes
-
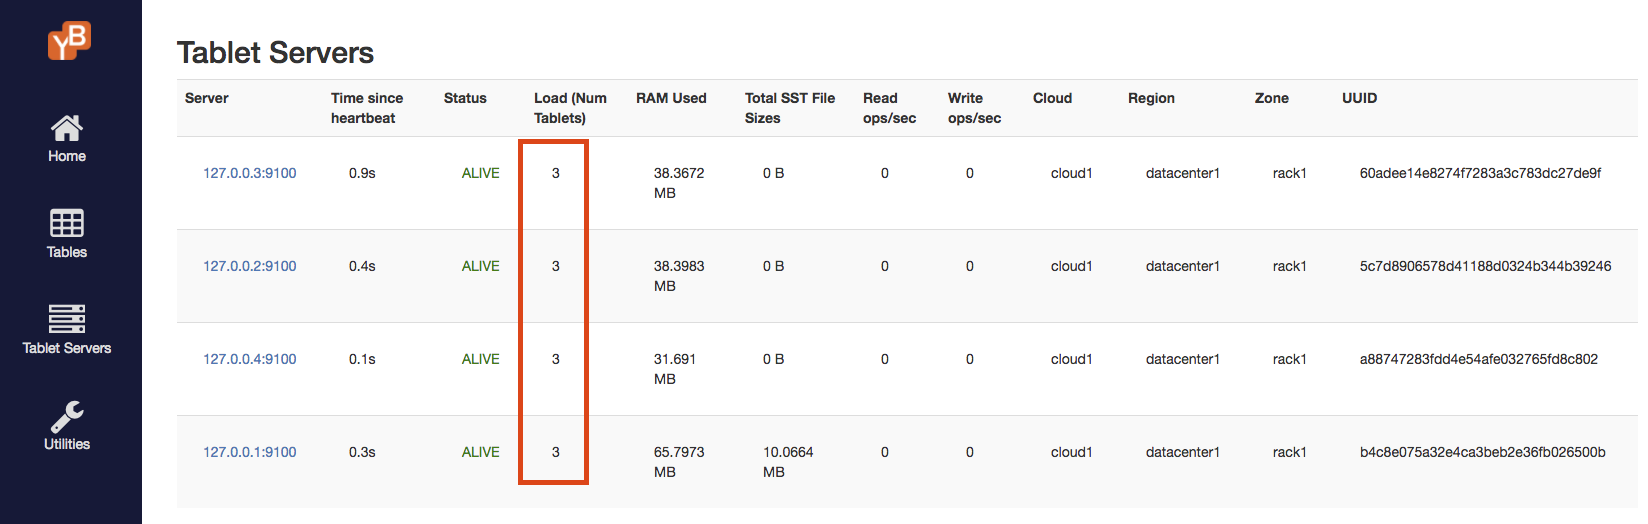
Add one more node to the universe for a total of 4 nodes:
$ ./bin/yb-ctl add_node --tserver_flags "memstore_size_mb=1" -
Check the tablet servers page, to see that the tablets are re-distributed evenly among the 4 nodes and each node now has 3 shards:
-
Add 2 more nodes to the universe, making it a total of 6 nodes:
$ ./bin/yb-ctl add_node --tserver_flags "memstore_size_mb=1"$ ./bin/yb-ctl add_node --tserver_flags "memstore_size_mb=1" -
Verify that the tablets are evenly distributed across the 6 nodes. Each node now has 2 tablets.

[Optional] Clean up
If you're done experimenting, run the following command to shut down the local cluster:
$ ./bin/yb-ctl destroy
Further reading
To learn more about sharding in YugabyteDB, you may wish to read the architecture documentation, or the following blog posts:
How Data Sharding Works in a Distributed SQL Database
Four Data Sharding Strategies We Analyzed in Building a Distributed SQL Database
Overcoming MongoDB Sharding and Replication Limitations with YugabyteDB