Join us on YugabyteDB Community Slack
Star us on
Get Started
Slack
GitHub
Get Started
v2.7 (latest) v2.4 (stable) v2.2 (earlier version) v2.1 (earlier version) v2.0 (earlier version) v1.3 (earlier version)
  • YUGABYTEDB CORE
    • Quick start
      • 1. Install YugabyteDB
      • 2. Create a local cluster
      • 3. Explore distributed SQL
      • 4. Build an application
        • Java
        • NodeJS
        • Go
        • Python
        • Ruby
        • C#
        • PHP
        • C++
        • C
        • Scala
    • Explore features
      • YSQL vs PostgreSQL
        • Schemas and Tables
        • Data Types
        • Data Manipulation
        • Queries and Joins
        • Expressions and Operators
        • Cursors
        • Stored Procedures
        • Triggers
        • Table Partitioning
        • Tablespaces
        • Views
      • Fault tolerance
      • Horizontal Scalability
        • Scaling Transactions
        • Sharding Data
      • Transactions
        • Distributed Transactions
        • Isolation Levels
        • Explicit Locking
      • JSON Support
      • Multi-Region Deployments
        • Sync replication (3+ regions)
        • Async Replication (2+ regions)
        • Row-Level Geo-Partitioning
      • Query Tuning
        • Analyzing Queries with EXPLAIN
        • Viewing live queries with pg_stat_activity
        • Optimizing YSQL queries using pg_hint_plan
      • Follower reads
      • Colocated tables
      • Change data capture (CDC)
      • Extensions
      • Observability
        • Prometheus Integration
      • Security
    • Develop
      • Learn app development
        • 1. SQL vs NoSQL
        • 2. Data modeling
        • 3. Data types
        • 4. ACID transactions
        • 5. Aggregations
        • 6. Batch operations
        • 7. Date and time
        • 8. Strings and text
        • 9. TTL for data expiration
      • Ecosystem integrations
        • Apache Kafka
        • Spring Framework
        • Apache Spark
        • JanusGraph
        • KairosDB
        • Hasura
        • Presto
        • Metabase
      • Build GraphQL apps
        • Hasura
        • Prisma
      • Real-world examples
        • E-Commerce app
        • IoT fleet management
        • Retail Analytics
      • Explore sample apps
      • Best practices
    • Migrate
      • Migration process overview
      • Migrate from PostgreSQL
        • Convert a PostgreSQL schema
        • Migrate a PostgreSQL application
        • Export PostgreSQL data
        • Prepare a cluster
        • Import PostgreSQL data
        • Verify Migration
    • Deploy
      • Deployment checklist
      • Manual deployment
        • 1. System configuration
        • 2. Install software
        • 3. Start YB-Masters
        • 4. Start YB-TServers
        • 5. Verify deployment
      • Kubernetes
        • Single-zone
          • Open Source
          • Amazon EKS
          • Google Kubernetes Engine
          • Azure Kubernetes Service
        • Multi-zone
          • Amazon EKS
          • Google Kubernetes Engine
        • Multi-cluster
          • Google Kubernetes Engine
        • Best practices
        • Connect Clients
      • Docker
      • Public clouds
        • Amazon Web Services
        • Google Cloud Platform
        • Microsoft Azure
      • Multi-DC deployments
        • Three+ data center (3DC)
        • Two data center (2DC)
        • Read replica clusters
      • Change data capture (CDC)
        • CDC to Kafka
    • Benchmark
      • TPC-C
      • sysbench
      • YCSB
      • Key-value workload
      • Large datasets
      • Scalability
        • Scaling queries
      • Resilience
        • Jepsen testing
      • Performance Troubleshooting
    • Secure
      • Security checklist
      • Enable Authentication
        • Enable User Authentication
        • Configure ysql_hba_conf_csv
      • Authentication Methods
        • Password Authentication
        • LDAP Authentication
        • Host-Based Authentication
        • Trust Authentication
      • Role-Based Access Control
        • Overview
        • Manage Users and Roles
        • Grant Privileges
        • Row-Level Security (RLS)
        • Column-Level Security
      • Encryption in Transit
        • Create server certificates
        • Enable server-to-server encryption
        • Enable client-to-server encryption
        • Connect to Clusters
      • Encryption at rest
      • Column-Level Encryption
      • Audit Logging
        • Configure Audit Logging
        • Session-Level Audit Logging
        • Object-Level Audit Logging
      • Vulnerability disclosure policy
    • Manage
      • Back up and restore
        • Back up data
        • Restore data
        • Point-in-time restore
        • Snapshot and restore data
      • Migrate data
        • Bulk import
        • Bulk export
      • Change cluster configuration
      • Diagnostics reporting
      • Upgrade a deployment
      • Grow cluster
    • Troubleshoot
      • Troubleshooting
      • Common error messages
      • Cluster level issues
        • YCQL connection issues
        • YEDIS connection Issues
        • Recover tserver/master
        • Replace a failed YB-TServer
        • Replace a failed YB-Master
        • Manual remote bootstrap when a majority of peers fail
      • Node level issues
        • Check servers
        • Inspect logs
        • System statistics
        • Disk failure
    • Contribute
      • Core database
        • Contribution checklist
        • Build the source
        • Configure a CLion project
        • Run the tests
  • YUGABYTE PLATFORM
    • Yugabyte Platform
      • Overview
        • Install
        • Configure
      • Install Yugabyte Platform
        • Prerequisites
        • Prepare the environment
        • Install software
        • Prepare nodes (on-prem)
        • Uninstall software
      • Configure Yugabyte Platform
        • Create admin user
        • Configure the cloud provider
        • Configure the backup target
        • Configure alerts and health checking
        • Create and edit instance tags
      • Create deployments
        • Multi-zone universe
        • Multi-region universe
        • Read replica cluster
      • Manage deployments
        • Start and stop processes
        • Add a node
        • Enable high availability
        • Remove a node
        • Edit a universe
        • Edit configuration flags
        • Upgrade the YugabyteDB software
        • Delete a universe
        • Migrate to Helm 3
      • Back up and restore universes
        • Configure backup storage
        • Back up universe data
        • Restore universe data
        • Schedule data backups
      • Security
        • Security checklist
        • Customize ports
        • Authorization platform
        • Create a KMS configuration
        • Enable encryption at rest
        • Enable encryption in transit (TLS)
        • Network security
      • Alerts and monitoring
        • Live Queries dashboard
        • Slow Queries dashboard
      • Troubleshoot
        • Install and upgrade issues
        • Universe issues
      • Administer Yugabyte Platform
        • Back Up and Restore Yugabyte Platform
  • YUGABYTE CLOUD
    • Yugabyte Cloud
      • Free tier
      • Create clusters
      • Monitor clusters
      • Create databases
      • Manage database access
      • Connect to clusters
  • REFERENCE
    • Reference
    • Architecture
      • Design goals
      • Key concepts
        • Universe
        • YB-TServer Service
        • YB-Master Service
      • Core functions
        • Universe creation
        • Table creation
        • Write IO path
        • Read IO path
        • High availability
      • Layered architecture
      • Query layer
        • Overview
      • DocDB transactions layer
        • Transactions overview
        • Transaction isolation levels
        • Explicit locking
        • Single-row transactions
        • Distributed transactions
        • Transactional IO path
      • DocDB sharding layer
        • Hash & range sharding
        • Tablet splitting
        • Colocated tables
      • DocDB replication layer
        • Replication
        • xCluster replication
        • Read replicas
        • Change data capture (CDC)
      • DocDB storage layer
        • Persistence
        • Performance
    • APIs
      • YSQL
        • The SQL language
          • SQL statements
            • ABORT
            • ALTER DATABASE
            • ALTER DEFAULT PRIVILEGES
            • ALTER DOMAIN
            • ALTER GROUP
            • ALTER POLICY
            • ALTER ROLE
            • ALTER SEQUENCE
            • ALTER TABLE
            • ALTER USER
            • BEGIN
            • CALL
            • COMMENT
            • COMMIT
            • COPY
            • CREATE AGGREGATE
            • CREATE CAST
            • CREATE DATABASE
            • CREATE DOMAIN
            • CREATE EXTENSION
            • CREATE FUNCTION
            • CREATE GROUP
            • CREATE INDEX
            • CREATE OPERATOR
            • CREATE OPERATOR CLASS
            • CREATE POLICY
            • CREATE PROCEDURE
            • CREATE ROLE
            • CREATE RULE
            • CREATE SCHEMA
            • CREATE SEQUENCE
            • CREATE TABLE
            • CREATE TABLE AS
            • CREATE TRIGGER
            • CREATE TYPE
            • CREATE USER
            • CREATE VIEW
            • DEALLOCATE
            • DELETE
            • DO
            • DROP AGGREGATE
            • DROP CAST
            • DROP DATABASE
            • DROP DOMAIN
            • DROP EXTENSION
            • DROP FUNCTION
            • DROP GROUP
            • DROP OPERATOR
            • DROP OPERATOR CLASS
            • DROP OWNED
            • DROP POLICY
            • DROP PROCEDURE
            • DROP ROLE
            • DROP RULE
            • DROP SEQUENCE
            • DROP TABLE
            • DROP TRIGGER
            • DROP TYPE
            • DROP USER
            • END
            • EXECUTE
            • EXPLAIN
            • GRANT
            • INSERT
            • LOCK
            • PREPARE
            • REASSIGN OWNED
            • RESET
            • REVOKE
            • ROLLBACK
            • SELECT
            • SET
            • SET CONSTRAINTS
            • SET ROLE
            • SET SESSION AUTHORIZATION
            • SET TRANSACTION
            • SHOW
            • SHOW TRANSACTION
            • TRUNCATE
            • UPDATE
            • VALUES
          • WITH clause
            • WITH clause—SQL syntax and semantics
            • recursive CTE
            • case study—traversing an employee hierarchy
            • traversing general graphs
              • graph representation
              • common code
              • undirected cyclic graph
              • directed cyclic graph
              • directed acyclic graph
              • rooted tree
              • Unique containing paths
              • Stress testing find_paths()
            • case study—Bacon Numbers from IMDb
              • Bacon numbers for synthetic data
              • Bacon numbers for IMDb data
        • Data types
          • Array
            • array[] constructor
            • Literals
              • Text typecasting and literals
              • Array of primitive values
              • Row
              • Array of rows
            • FOREACH loop (PL/pgSQL)
            • array of DOMAINs
            • Functions and operators
              • ANY and ALL
              • Array comparison
              • Array slice operator
              • Array concatenation
              • Array properties
              • array_agg(), unnest(), generate_subscripts()
              • array_fill()
              • array_position(), array_positions()
              • array_remove()
              • array_replace() / set value
              • array_to_string()
              • string_to_array()
          • Binary
          • Boolean
          • Character
          • Date and time
          • JSON
            • JSON literals
            • Primitive and compound data types
            • Code example conventions
            • Indexes and check constraints
            • Functions & operators
              • ::jsonb, ::json, ::text (typecast)
              • ->, ->>, #>, #>> (JSON subvalues)
              • - and #- (remove)
              • || (concatenation)
              • = (equality)
              • @> and <@ (containment)
              • ? and ?| and ?& (key or value existence)
              • array_to_json()
              • jsonb_agg()
              • jsonb_array_elements()
              • jsonb_array_elements_text()
              • jsonb_array_length()
              • jsonb_build_object()
              • jsonb_build_array()
              • jsonb_each()
              • jsonb_each_text()
              • jsonb_extract_path()
              • jsonb_extract_path_text() and json_extract_path_text()
              • jsonb_object()
              • jsonb_object_agg()
              • jsonb_object_keys()
              • jsonb_populate_record()
              • jsonb_populate_recordset()
              • jsonb_pretty()
              • jsonb_set() and jsonb_insert()
              • jsonb_strip_nulls()
              • jsonb_to_record()
              • jsonb_to_recordset()
              • jsonb_typeof()
              • row_to_json()
              • to_jsonb()
          • Money
          • Numeric
          • Range
          • Serial
          • UUID
        • Functions and operators
          • Aggregate functions
            • Informal functionality overview
            • Invocation syntax and semantics
            • grouping sets, rollup, cube
            • Per function signature and purpose
              • avg(), count(), max(), min(), sum()
              • array_agg(), string_agg(), jsonb_agg(), jsonb_object_agg()
              • bit_and(), bit_or(), bool_and(), bool_or()
              • variance(), var_pop(), var_samp(), stddev(), stddev_pop(), stddev_samp()
              • linear regression
                • covar_pop(), covar_samp(), corr()
                • regr_%()
              • mode(), percentile_disc(), percentile_cont()
              • rank(), dense_rank(), percent_rank(), cume_dist()
            • case study—percentile_cont() and the "68–95–99.7" rule
            • case study—linear regression on COVID data
              • Download the COVIDcast data
              • Ingest the COVIDcast data
                • Inspect the COVIDcast data
                • Copy the .csv files to staging tables
                • Check staged data conforms to the rules
                • Join the staged data into a single table
                • SQL scripts
                  • Create cr_staging_tables()
                  • Create cr_copy_from_scripts()
                  • Create assert_assumptions_ok()
                  • Create xform_to_covidcast_fb_survey_results()
                  • ingest-the-data.sql
              • Analyze the COVIDcast data
                • symptoms vs mask-wearing by day
                • Data for scatter-plot for 21-Oct-2020
                • Scatter-plot for 21-Oct-2020
                • SQL scripts
                  • analysis-queries.sql
                  • synthetic-data.sql
          • currval()
          • lastval()
          • nextval()
          • Window functions
            • Informal functionality overview
            • Invocation syntax and semantics
            • Per function signature and purpose
              • row_number(), rank() and dense_rank()
              • percent_rank(), cume_dist() and ntile()
              • first_value(), nth_value(), last_value()
              • lag(), lead()
              • Tables for the code examples
                • table t1
                • table t2
                • table t3
                • table t4
            • case study—analyzing a normal distribution
              • Bucket allocation scheme
              • do_clean_start.sql
              • cr_show_t4.sql
              • cr_dp_views.sql
              • cr_int_views.sql
              • cr_pr_cd_equality_report.sql
              • cr_bucket_using_width_bucket.sql
              • cr_bucket_dedicated_code.sql
              • do_assert_bucket_ok
              • cr_histogram.sql
              • cr_do_ntile.sql
              • cr_do_percent_rank.sql
              • cr_do_cume_dist.sql
              • do_populate_results.sql
              • do_report_results.sql
              • do_compare_dp_results.sql
              • do_demo.sql
              • Reports
                • Histogram report
                • dp-results
                • compare-dp-results
                • int-results
        • Extensions
        • Keywords
        • Reserved names
      • YCQL
        • ALTER KEYSPACE
        • ALTER ROLE
        • ALTER TABLE
        • CREATE INDEX
        • CREATE KEYSPACE
        • CREATE ROLE
        • CREATE TABLE
        • CREATE TYPE
        • DROP INDEX
        • DROP KEYSPACE
        • DROP ROLE
        • DROP TABLE
        • DROP TYPE
        • GRANT PERMISSION
        • GRANT ROLE
        • REVOKE PERMISSION
        • REVOKE ROLE
        • USE
        • INSERT
        • SELECT
        • EXPLAIN
        • UPDATE
        • DELETE
        • TRANSACTION
        • TRUNCATE
        • Simple expressions
        • Subscripted expressions
        • Function call
        • Operators
        • BLOB
        • BOOLEAN
        • Collection
        • FROZEN
        • INET
        • Integer and counter
        • Non-integer
        • TEXT
        • DATE, TIME, and TIMESTAMP
        • UUID and TIMEUUID
        • JSONB
        • Date and time
        • BATCH
    • CLIs
      • yb-ctl
      • yb-docker-ctl
      • ysqlsh
      • ycqlsh
      • yb-admin
      • yb-ts-cli
      • ysql_dump
      • ysql_dumpall
    • Configuration
      • yb-tserver
      • yb-master
      • yugabyted
      • Default ports
    • Drivers
      • Client drivers for YSQL API
      • YugabyteDB JDBC Driver
      • Client drivers for YCQL
      • Spring Data YugabyteDB
    • Connectors
      • Kafka Connect YugabyteDB
    • Third party tools
      • DBeaver
      • DbSchema
      • pgAdmin
      • SQL Workbench/J
      • TablePlus
      • Visual Studio Code
    • Sample datasets
      • Chinook
      • Northwind
      • PgExercises
      • SportsDB
  • RELEASES
    • Releases
    • Releases overview
    • Release versioning
    • What's new
      • v2.7 (latest)
      • v2.4 (stable)
    • Earlier releases
      • v2.5 series
      • v2.3.3
      • v2.3.2
      • v2.3.1
      • v2.3.0
      • v2.2.0 series
      • v2.1.8
      • v2.1.6
      • v2.1.5
      • v2.1.4
      • v2.1.3
      • v2.1.2
      • v2.1.1
      • v2.1.0
      • v2.0.11
      • v2.0.10
      • v2.0.9
      • v2.0.8
      • v2.0.7
      • v2.0.6
      • v2.0.5
      • v2.0.3
      • v2.0.1
      • v2.0.0
      • v1.3.1
      • v1.3.0
      • v1.2.12
      • v1.2.11
      • v1.2.10
      • v1.2.9
      • v1.2.8
      • v1.2.6
      • v1.2.5
      • v1.2.4
  • FAQ
    • Comparisons
      • Amazon Aurora
      • Google Cloud Spanner
      • CockroachDB
      • TiDB
      • Vitess
      • MongoDB
      • FoundationDB
      • Amazon DynamoDB
      • Azure Cosmos DB
      • Apache Cassandra
      • PostgreSQL
      • Redis in-memory store
      • Apache HBase
    • FAQs
      • General FAQ
      • Operations FAQ
      • API compatibility FAQ
      • Yugabyte Platform FAQ
  • MISC
    • YEDIS
      • Quick start
      • Develop
        • Build an application
        • C#
        • C++
        • Go
        • Java
        • NodeJS
        • Python
      • API reference
        • APPEND
        • AUTH
        • CONFIG
        • CREATEDB
        • DELETEDB
        • LISTDB
        • SELECT
        • DEL
        • ECHO
        • EXISTS
        • EXPIRE
        • EXPIREAT
        • FLUSHALL
        • FLUSHDB
        • GET
        • GETRANGE
        • GETSET
        • HDEL
        • HEXISTS
        • HGET
        • HGETALL
        • HINCRBY
        • HKEYS
        • HLEN
        • HMGET
        • HMSET
        • HSET
        • HSTRLEN
        • HVALS
        • INCR
        • INCRBY
        • KEYS
        • MONITOR
        • PEXPIRE
        • PEXPIREAT
        • PTTL
        • ROLE
        • SADD
        • SCARD
        • RENAME
        • SET
        • SETEX
        • PSETEX
        • SETRANGE
        • SISMEMBER
        • SMEMBERS
        • SREM
        • STRLEN
        • ZRANGE
        • TSADD
        • TSCARD
        • TSGET
        • TSLASTN
        • TSRANGEBYTIME
        • TSREM
        • TSREVRANGEBYTIME
        • TTL
        • ZADD
        • ZCARD
        • ZRANGEBYSCORE
        • ZREM
        • ZREVRANGE
        • ZSCORE
        • PUBSUB
        • PUBLISH
        • SUBSCRIBE
        • UNSUBSCRIBE
        • PSUBSCRIBE
        • PUNSUBSCRIBE
    • Legal
      • Third party software
> Yugabyte Platform > Install Yugabyte Platform >

Install Yugabyte Platform Software - OpenShift

  • Prerequisites
  • Operator-Based Installation
    • Installing the Operator
    • Creating an Instance of Yugabyte Platform via Operator
    • Upgrading the Yugabyte Platform Instance
  • Helm-Based Installation
    • Creating an Instance of Yugabyte Platform via Helm
    • Deleting the Helm Installation of Yugabyte Platform
  • Finding the Availability Zone Labels
    • How to Use the OpenShift Web Console
    • How to Use the Command Line
  • Configuring the CLI with the OCP Cluster
  • Accessing and Configuring Yugabyte Platform
    • How to Find the Location to Access the Web UI
  • Default
  • Kubernetes
  • Airgapped
  • OpenShift

To install Yugabyte Platform on an OpenShift cluster, you can use Yugabyte Platform Operator or the Helm tool.

Prerequisites

Before you install Yugabyte Platform on an OpenShift cluster, you need to prepare the environment, as described in Prepare the OpenShift Environment.

Unless otherwise specified, you can use a user account for executing the steps described in this document. Using admin account for all the steps should work as well.

Operator-Based Installation

Installing Yugabyte Platform on an OpenShift cluster using the Yugabyte Platform Operator involves the following:

  • Installing the Operator itself
  • Creating an instance of Yugabyte Platform
  • Finding the availability zone labels
  • Configuring the CLI with the OCP cluster
  • Accessing and configuring Yugabyte Platform
  • Optionally, upgrading the Yugabyte Platform instance

Installing the Operator

You can install the Yugabyte Platform Operator via the OpenShift web console or command line.

How to Use the OpenShift Web Console

You can install the Yugabyte Platform Operator as follows:

  • Login to the OpenShift Container Platform (OCP) cluster’s web console using admin credentials (for example, kube:admin).
  • Navigate to the Operators > OperatorHub, search for Yugabyte Platform Operator, and then open it to display details about the operator, as shown in the following illustration:
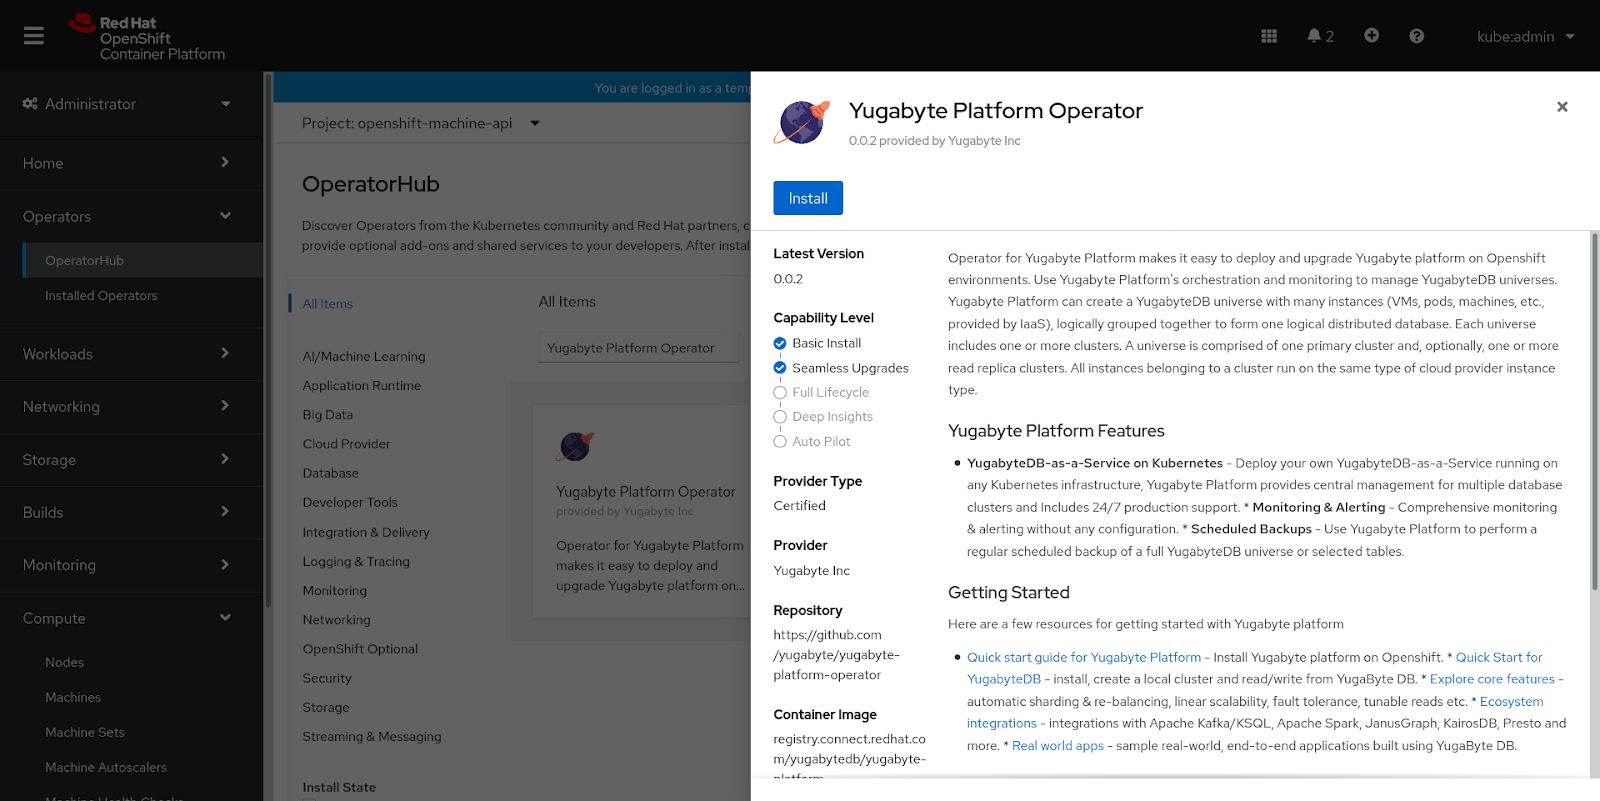
Operator

  • Click Install.
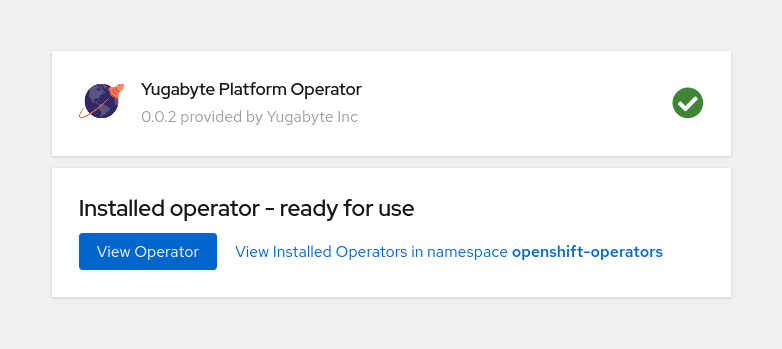
  • Accept default settings on the Install Operator page, as shown in the following illustration, and then click Install.

Install Operator

Once the installation is complete, a message shown in the following illustration is displayed:

Operator Installed

How to Use the Command Line

Alternatively, you can install the operator via the command line. You start by configuring oc with an admin account (kube:admin) and following the procedure described in Configuring oc with the OCP Cluster.

To install the Yugabyte Platform Operator, execute the following command:

oc apply -f - <<EOF
apiVersion: operators.coreos.com/v1alpha1
kind: Subscription
metadata:
  name: yugabyte-platform-operator-bundle
  namespace: openshift-operators
spec:
  channel: alpha
  name: yugabyte-platform-operator-bundle
  source: certified-operators
  sourceNamespace: openshift-marketplace
EOF

This creates a Subscription object and installs the operator in the cluster, as demonstrated by the following output:

# output
subscription.operators.coreos.com/yugabyte-platform-operator-bundle created

To verify that the operator pods are in Running state, execute the following command:

oc get pods -n openshift-operators | grep -E '^NAME|yugabyte-platform'
# output
NAME                                                         READY  STATUS  RESTARTS  AGE
yugabyte-platform-operator-controller-manager-7485db7486-6nzxr 2/2  Running  0      5m38s

For additional information, see Adding Operators to a Cluster.

Creating an Instance of Yugabyte Platform via Operator

You start by creating an instance of Yugabyte Platform in a new project (namespace) called yb-platform. To do this, you can use the OpenShift web console or command line.

How to Use the OpenShift Web Console

You can create an instance of Yugabyte Platform via the OpenShift web console as follows:

  • Open the OCP web console and navigate to Home > Projects > Create Project.
  • Enter the name yb-platform and click Create.
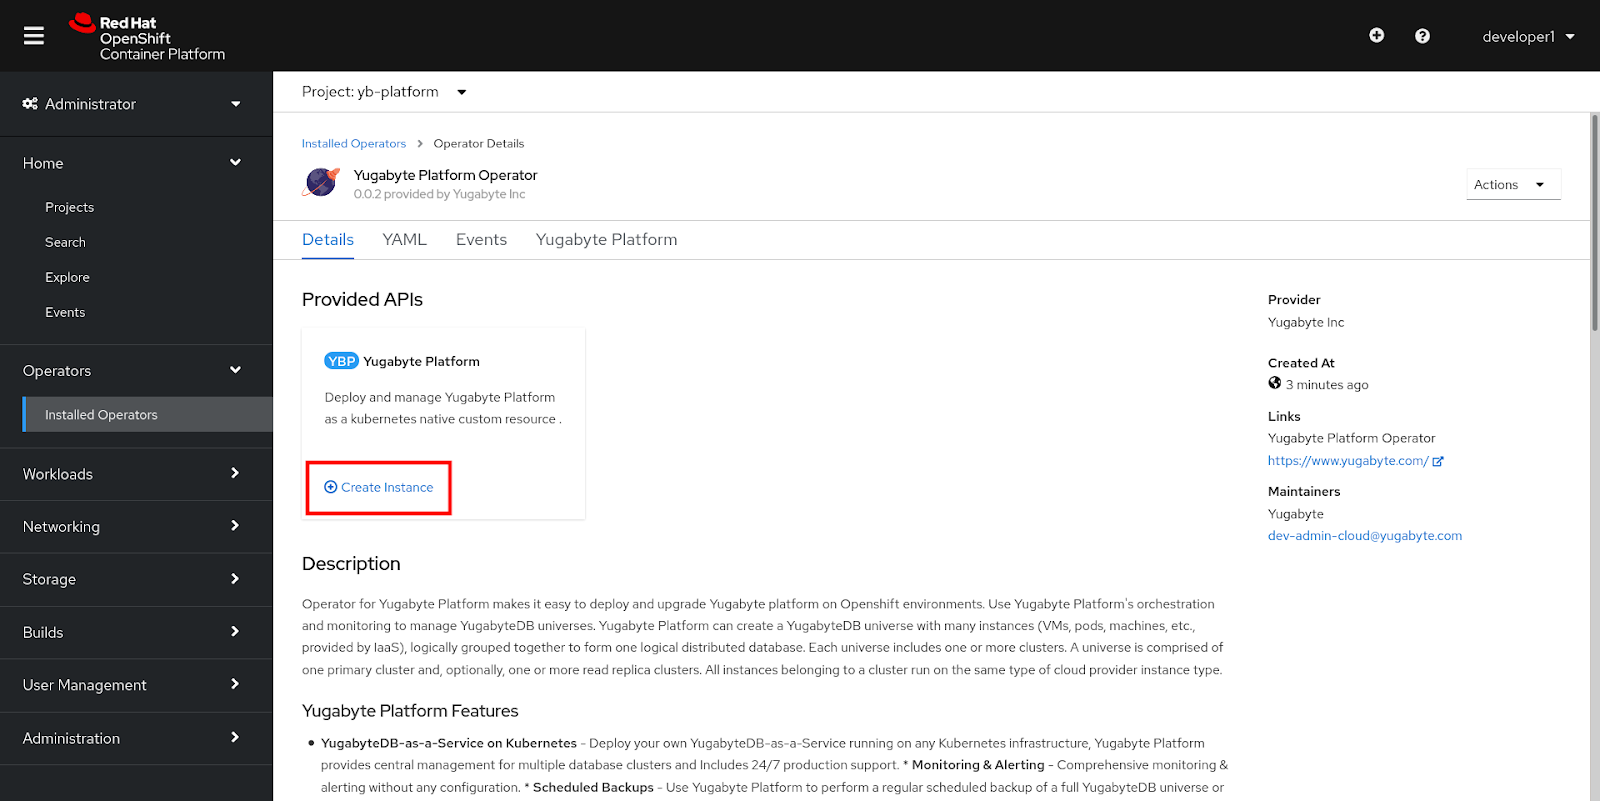
  • Navigate to Operators > Installed Operators and select Yugabyte Platform Operator, as shown in the following illustration:

Yugabyte Platform Install Operator

  • Click Create Instance to open the Create YBPlatform page.

  • Ensure that the yb-platform project is selected and review the default settings.

  • Accept the default settings without modifying them, unless your cluster has a StorageClass other than standard, in which case open YAML View and change the value of spec.yugaware.storageClass to the correct StorageClass name.

    You can find the StorageClass by navigating to Storage > Storage Classes on the OpenShift Web Console as admin user.
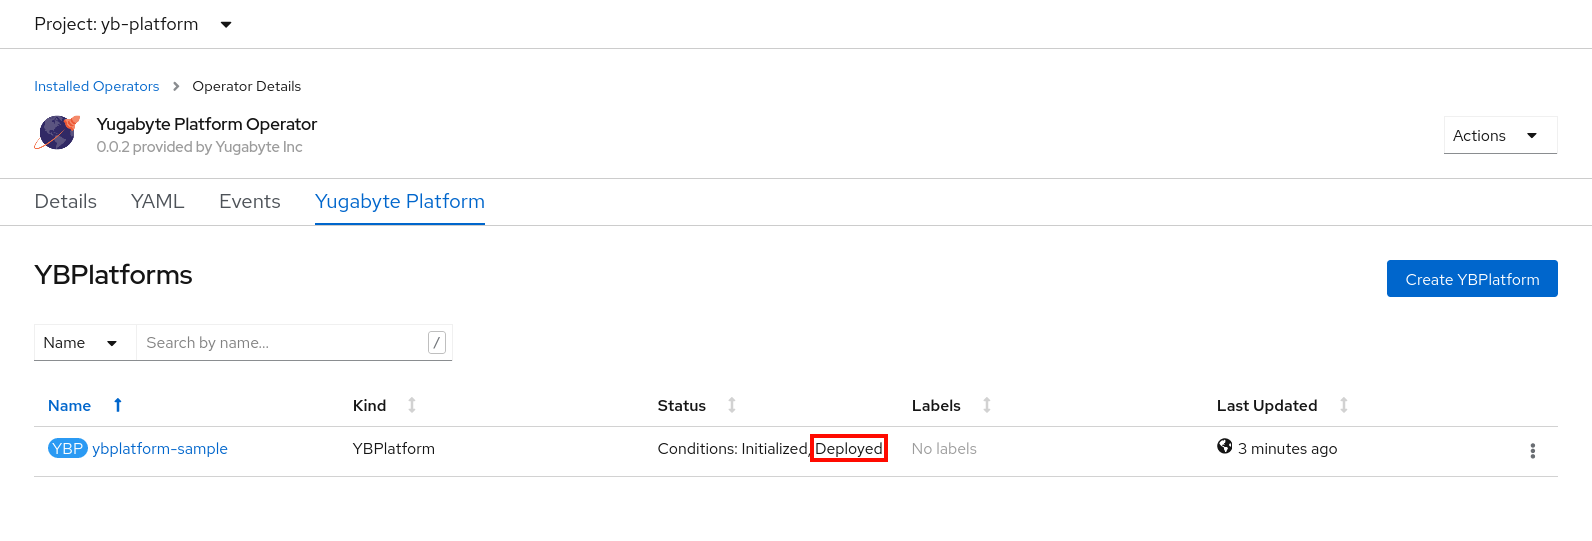
  • Click Create.

Shortly, you should expect the Status column in the Yugabyte Platform tab to display Deployed, as shown in the following illustration:

Yugabyte Platform Installed Operator

How to Use the Command Line

Alternatively, you can create an instance of Yugabyte Platform via the command line, as follows:

  • To create a new project, execute the following command:

    oc new-project yb-platform
    
    # output
    Now using project "yb-platform" on server "web-console-address"
    
  • Verify the StorageClass setting for your cluster by executing the following command as admin user:

    oc get storageClass
    

    If your cluster's StorageClass is not standard, change the value of spec.yugaware.storageClass to the correct StorageClass name when you create an instance of Yugabyte Platform.

  • To create an instance of Yugabyte Platform in the yb-platform project, execute the following command:

    oc apply \
      -n yb-platform \
      -f - <<EOF
    apiVersion: yugabyte.com/v1alpha1
    kind: YBPlatform
    metadata:
      name: ybplatform-sample
    spec:
      image:
        repository: registry.connect.redhat.com/yugabytedb/yugabyte-platform
        tag: latest
      ocpCompatibility:
        enabled: true
      rbac:
        create: false
    EOF
    
    # output
    ybplatform.yugabyte.com/ybplatform-sample created
    
  • To verify that the pods of the Yugabyte Platform instance are in Running state, execute the following:

    oc get pods -n yb-platform -l app=ybplatform-sample-yugaware
    
    # output
    NAME                         READY  STATUS  RESTARTS  AGE
    Ybplatform-sample-yugaware-0  5/5   Running  0        22s
    

Upgrading the Yugabyte Platform Instance

You may choose to upgrade the Yugabyte Platform instance installed using the Operator to a new tag that you receive from Yugabyte. In the current release, you can do this by using the command line.

The following example shows the command you would execute to update the container image tag to 2.5.2.0-b89:

oc patch \
 ybplatform ybplatform-sample \
 -p '{"spec":{"image":{"tag":"2.5.2.0-b89"}}}' --type merge \
 -n yb-platform
# output
ybplatform.yugabyte.com/ybplatform-sample patched

To verify that the pods are being updated, execute the following command:

oc get pods -n yb-platform -l app=ybplatform-sample-yugaware -w
# output
NAME                         READY  STATUS          RESTARTS  AGE
ybplatform-sample-yugaware-0  5/5   Running            0     18m
ybplatform-sample-yugaware-0  0/5   Terminating        0     19m
ybplatform-sample-yugaware-0  0/5   Pending            0     0s
ybplatform-sample-yugaware-0  0/5   ContainerCreating  0     35s
ybplatform-sample-yugaware-0  5/5   Running            0     93s

Helm-Based Installation

In addition to meeting the requirements described in Prepare the OpenShift Environment, you need to perform the following steps before attempting to install Yugbyte Platform using Helm:

  • Verify that the OpenShift cluster is configured with Helm 3 or later by executing the following command:

    $ helm version
    

    The output should be similar to the following:

    version.BuildInfo{Version:"v3.2.1", GitCommit:"fe51cd1e31e6a202cba7dead9552a6d418ded79a", GitTreeState:"clean", GoVersion:"go1.13.10"
    
  • Ensure that an OpenShift secret license file has been obtained from Yugabyte Support.

Installing Yugabyte Platform on an OpenShift cluster using Helm involves the following:

  • Creating an instance of Yugabyte Platform
  • Finding the availability zone labels
  • Configuring the CLI with the OCP cluster
  • Accessing and configuring Yugabyte Platform

Creating an Instance of Yugabyte Platform via Helm

To create a Yugabyte Platform instance, perform the following:

  • Create a new project (namespace) called yb-platform by executing the following command:

    oc new-project yb-platform
    
    # output
    Now using project "yb-platform" on server "web-console-address"
    
  • Apply the Yugabyte Platform secret that you obtained from Yugabyte Support by executing the following command:

    oc create -f yugabyte-k8s-secret.yml -n yb-platform 
    
    # output
    secret/yugabyte-k8s-pull-secret created 
    
  • Execute the following command to add the YugabyteDB charts repository:

    helm repo add yugabytedb https://charts.yugabyte.com
    
    # output
    "yugabytedb" has been added to your repositories
    

    To search for the available chart version, execute the following command:

    helm search repo yugabytedb/yugaware -l 
    
    # output
    NAME              CHART VERSION  APP VERSION   DESCRIPTION                    
    yugabytedb/yugaware   2.5.3      2.5.3.1-b10   YugaWare is YugaByte Database's...  
    
  • Verify the StorageClass setting for your cluster by executing the following command as admin user:

    oc get storageClass
    

    If your cluster's StorageClass is not standard, add --set yugaware.storageClass=<storage-class-name> when installing the Yugabyte Platform Helm chart in the next step.

  • Execute the following command to install the Yugabyte Platform Helm chart:

    helm install yw-test yugabytedb/yugaware -n yb-platform \
       --set image.tag=latest-ubi \
       --set ocpCompatibility.enabled=true --set rbac.create=false --wait
    

    Expect to see a message notifying you whether or not the deployment is successful.

    Note that if you are executing the preceding command as an admin user, then you can set rabc.create=true. Alternatively, you can ask the cluster administrator to perform the next step.

  • Optionally, execute the following command as an admin user to create ClusterRoleBinding:

    oc apply -f - <<EOF
    kind: ClusterRoleBinding
    apiVersion: rbac.authorization.k8s.io/v1
    metadata:
      name: yw-test-cluster-monitoring-view
      labels:
        app: yugaware
      subjects:
      - kind: ServiceAccount
        name: yw-test
        namespace: yb-platform
      roleRef:
        kind: ClusterRole
        name: cluster-monitoring-view
        apiGroup: rbac.authorization.k8s.io
    EOF
    

Deleting the Helm Installation of Yugabyte Platform

You can delete the Helm installation by executing the following command:

helm delete yw-test -n yb-platform

Finding the Availability Zone Labels

You need to find the region name and availability zone codes where the cluster is running. This information is required by Yugabyte Platform (see Creating a Provider in Yugabyte Platform). For example, if your OCP cluster is in the US East, then the cloud provider's zone labels can be us-east4-a, us-east4-b, and so on.

You can use the OpenShift web console or the command line to search for the availability zone codes.

How to Use the OpenShift Web Console

You start by logging in the OCP's web console as admin user, and then performing the following:

  • Navigate to Compute > Machine Sets and open each Machine Set.

  • On the Machine Set Details page, open the Machines tab to access the region and availability zone label, as shown in the following illustration where the region is US East and the availability zone label is us-east4-a.

    Create Machines

How to Use the Command Line

Alternatively, you can find the availability zone codes via the command line.

You start by configuring oc with an admin account (kube:admin) and following the procedure described in Configuring oc with the OCP Cluster.

To find the region and zone labels, execute the following command:

oc get machinesets \
  -n openshift-machine-api \
  -ojsonpath='{range .items[*]}{.metadata.name}{", region: "}{.spec.template.spec.providerSpec.value.region}{", zone: "}{.spec.template.spec.providerSpec.value.zone}{"\n"}{end}'
# output
  ocp-dev4-l5ffp-worker-a, region: us-east4, zone: us-east4-a
  ocp-dev4-l5ffp-worker-b, region: us-east4, zone: us-east4-b
  ocp-dev4-l5ffp-worker-c, region: us-east4, zone: us-east4-c

After the execution, the region is displayed as US East and the zones as us-east4-a, us-east4-b, and so on.

Configuring the CLI with the OCP Cluster

To configure the OpenShift command-line interface (CLI) tool oc, you start by logging in to the OCP web console with your user account. For more information and specific instructions, see Getting Started with the CLI.

Accessing and Configuring Yugabyte Platform

Once you have created and deployed Yugabyte Platform, you can access its web UI and create an account.

How to Find the Location to Access the Web UI

To find the location (IP address or hostname), you can use the OpenShift web console or the command line.

Using the OpenShift Web Console

You can obtain the location using the OpenShift web console as follows:

  • Use the OCP web console to navigate to Networking > Services and select ybplatform-sample-yugaware-ui from the list. Ensure that the yb-platform project is selected.
  • In the Service Routing section of the Details tab, locate External Load Balancer and copy the value, as shown in the following illustration:

Service Details

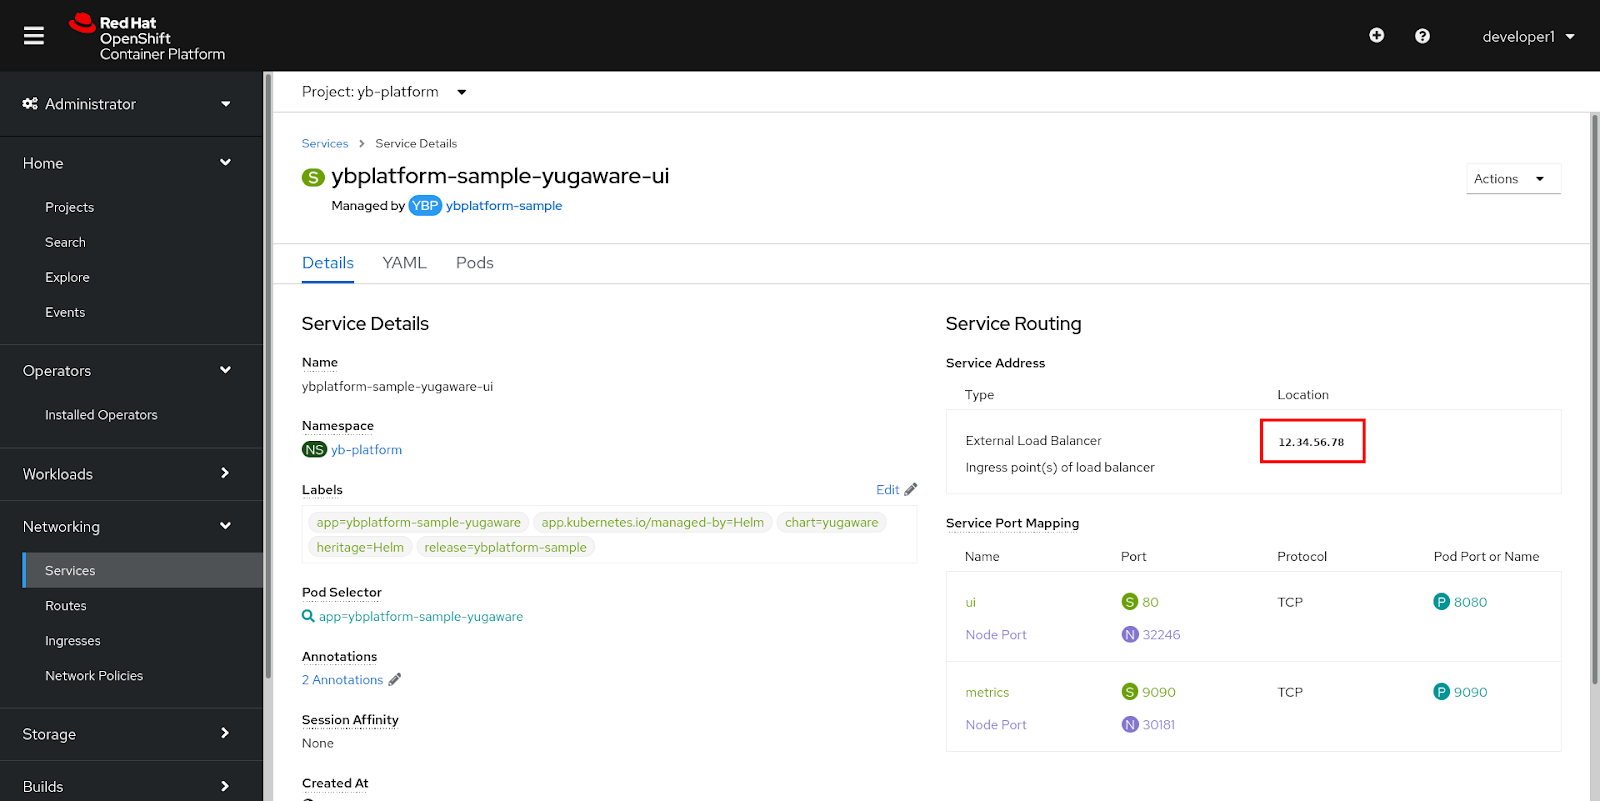
  • Open the copied location in a new instance of your web browser.

Using the Command Line

Alternatively, you can obtain the information about the location via the command line.

In case of the Operator-based installation of Yugabyte Platform, execute the following command:

oc get services \
  ybplatform-sample-yugaware-ui \
  -ojsonpath='{.status.loadBalancer.ingress[0].ip}{"\n"}
              {.status.loadBalancer.ingress[0].hostname}{"\n"}'
# output
12.34.56.78

In case of the Helm-based installation, execute the following command:

oc get services \
   yw-test-yugaware-ui \
  -ojsonpath='{.status.loadBalancer.ingress[0].ip}{"\n"}
              {.status.loadBalancer.ingress[0].hostname}{"\n"}'
# output
12.34.56.78
  • Prerequisites
  • Operator-Based Installation
    • Installing the Operator
    • Creating an Instance of Yugabyte Platform via Operator
    • Upgrading the Yugabyte Platform Instance
  • Helm-Based Installation
    • Creating an Instance of Yugabyte Platform via Helm
    • Deleting the Helm Installation of Yugabyte Platform
  • Finding the Availability Zone Labels
    • How to Use the OpenShift Web Console
    • How to Use the Command Line
  • Configuring the CLI with the OCP Cluster
  • Accessing and Configuring Yugabyte Platform
    • How to Find the Location to Access the Web UI
Ask our community
  • Slack
  • Github
  • Forum
  • StackOverflow
Yugabyte
Contact Us
Copyright © 2017-2021 Yugabyte, Inc. All rights reserved.